
How to Create and Optimize Your Facebook Business Page
Creating a Facebook business page is a simple step you can take towards promoting your business and driving interested and qualified traffic to your website. Making a custom Facebook page is just another powerful (and free) tool for your digital toolbox.
If you’re wondering if Facebook marketing will work for your business, consider that in 2020 Facebook has over 2 billion active monthly users. Odds are that some of your target audience is active on this platform. Keep in mind that certain types of businesses - adult-themed or cannabis/CBD-related ventures, for example - will not be able to advertise on Facebook, but most brands are at least permitted to create a page and employ organic marketing.
- What is a Facebook Business Page?
- How to Create a Facebook Business Page
- How to Optimize Your Facebook Page
- What You Can Do With a Facebook Business Page
- So do you have your Facebook Business Page yet?
What is a Facebook Business Page?
It’s a dynamic page on Facebook dedicated to promoting your business or brand. You can feature information such as your name, address, phone number, email, and other relevant info. You can also collect likes and followers, receive reviews, and create or schedule posts for your audience to enjoy.
What’s the Difference Between My Facebook Profile and a Business Page?
In many ways, your Facebook page and profile are similar. You can go live on both, make posts and status updates, gain followers, and so on. But there are also some key differences. On a Facebook page you can:
- Schedule posts in advance
- Assign roles and privileges to employees/team members
- Connect to your Instagram account
- See post analytics such as views and engagement
- Boost posts and create ads (when connected to an ad account)
- Integrate chatbots and other marketing tools
With all of these extra features on pages, you might be wondering why people still choose to promote their businesses using their personal page. There are actually several advantages to using a Facebook profile as well:
- Facebook posts on your profile tend to get better engagement than organic posts on business pages
- You can connect with people by adding them as friends, which makes them a follower by default
- Many people are less suspicious of and more likely to reach out to personal profiles than business pages
While there is definitely some value in marketing directly from your personal profile on occasion, not having a business page would be a mistake in most cases. Facebook is an authoritative social media platform, so having your website URL and contact information displayed there are important social signals for SEO. And because of the billions of users on Facebook, a dedicated page for your business can be a deciding factor in building trust (especially if you receive good public feedback!).
How to Create a Facebook Business Page
There are a couple of ways you can get started, but the easiest is just to sign in to your personal account and click on the plus icon in the upper right corner.
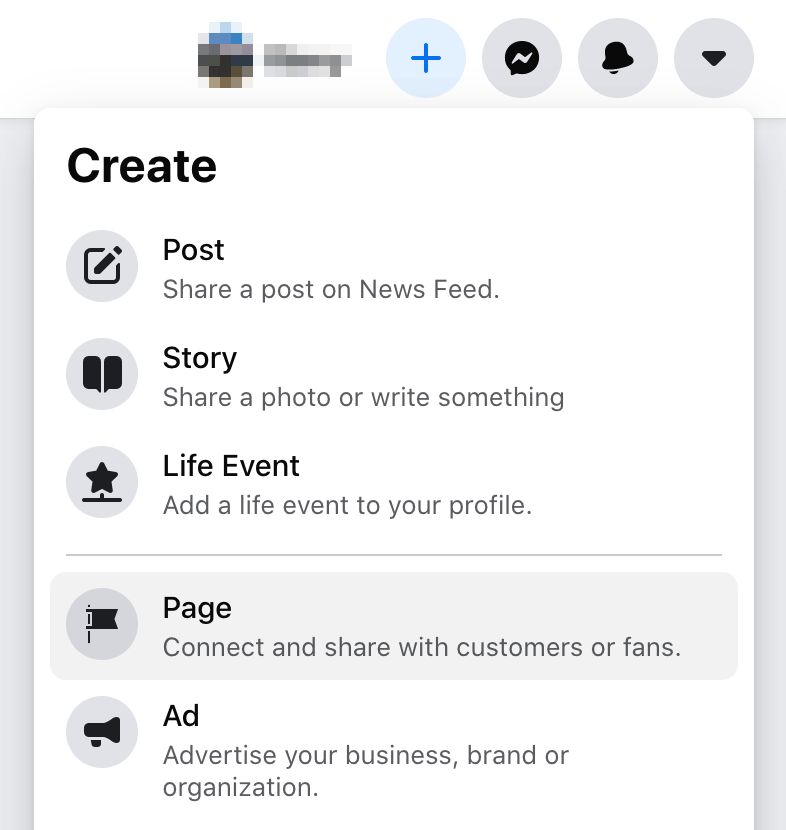
Click on Page to go to the Facebook page creation screen. It changes fairly frequently, but as of the latest update it looks like this:
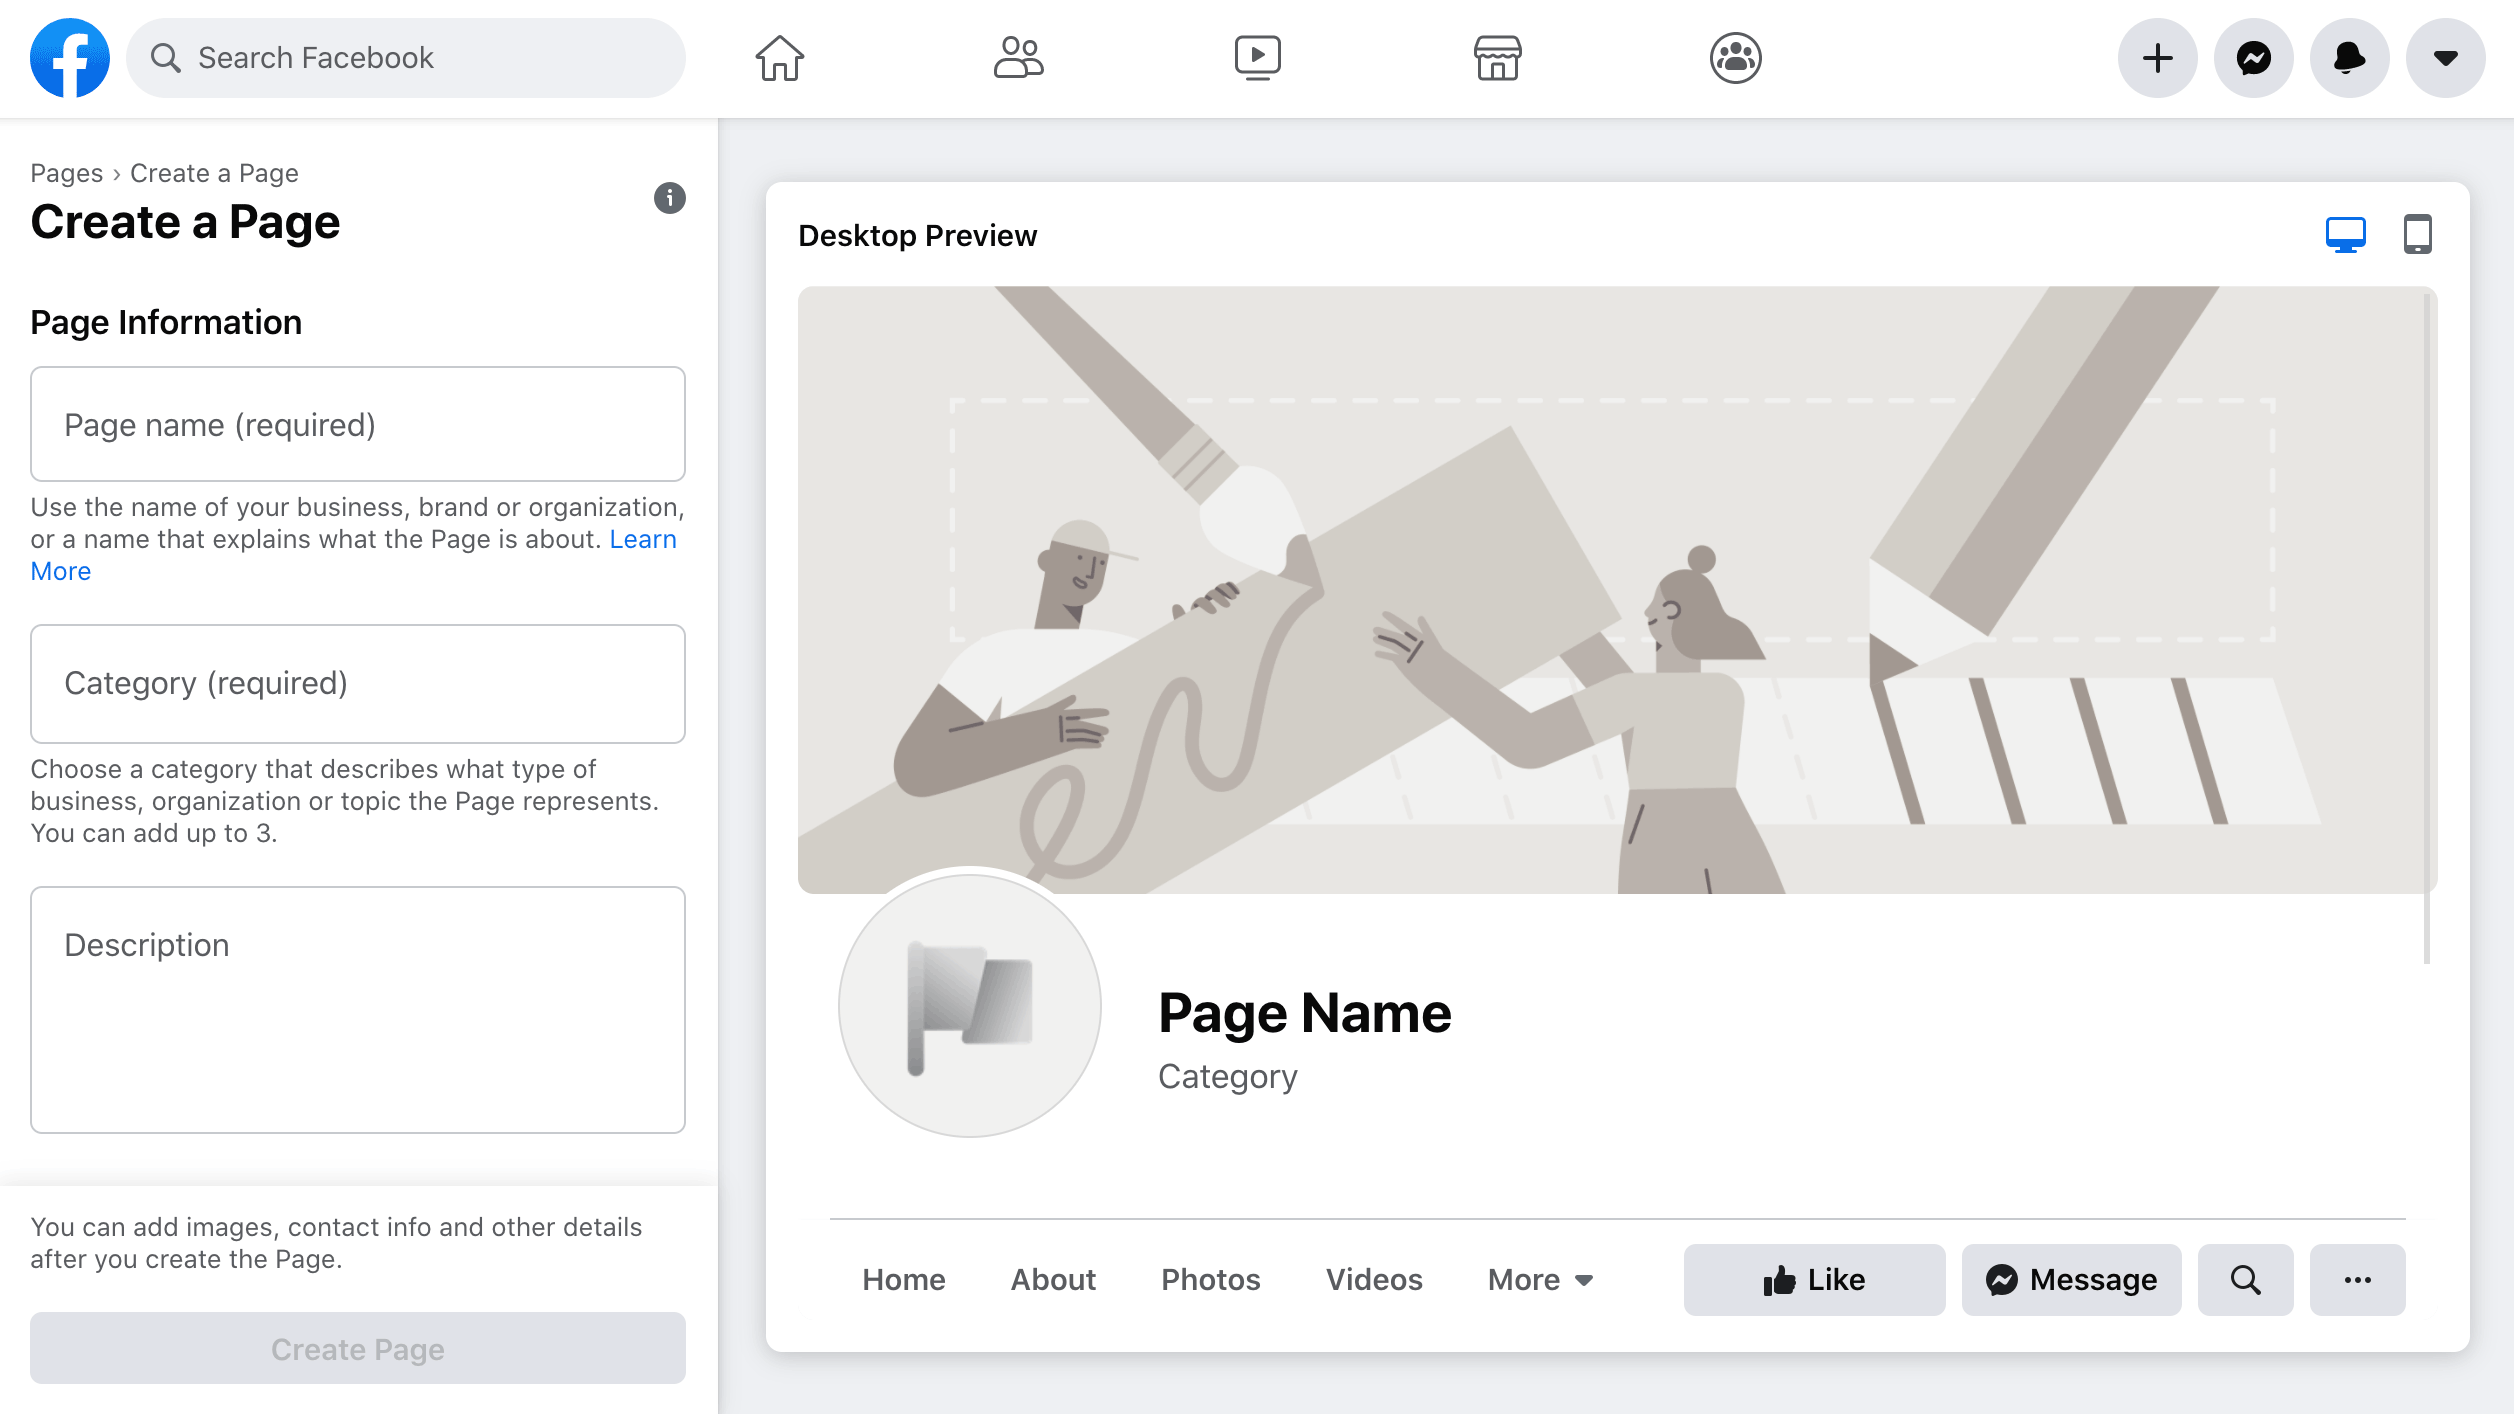
Fill out all available fields and then click the Create Page button.
- For Page name it’s best to put the exact name of your business or as close to it as you can get. If you don’t have a business, use your usual screen name or something that provides an idea of what you do.
- For Category start typing a word associated with your business activity and select the best option you can find. For example, there is no “web hosting provider” category, so WHC uses “Web Designer” and “Internet Technology Company” instead.
- Description may be left blank, but filling it out with an accurate and keyword-rich descriptor is important, so you may as well do it right away. You can always alter it later!
How to Optimize Your Facebook Page
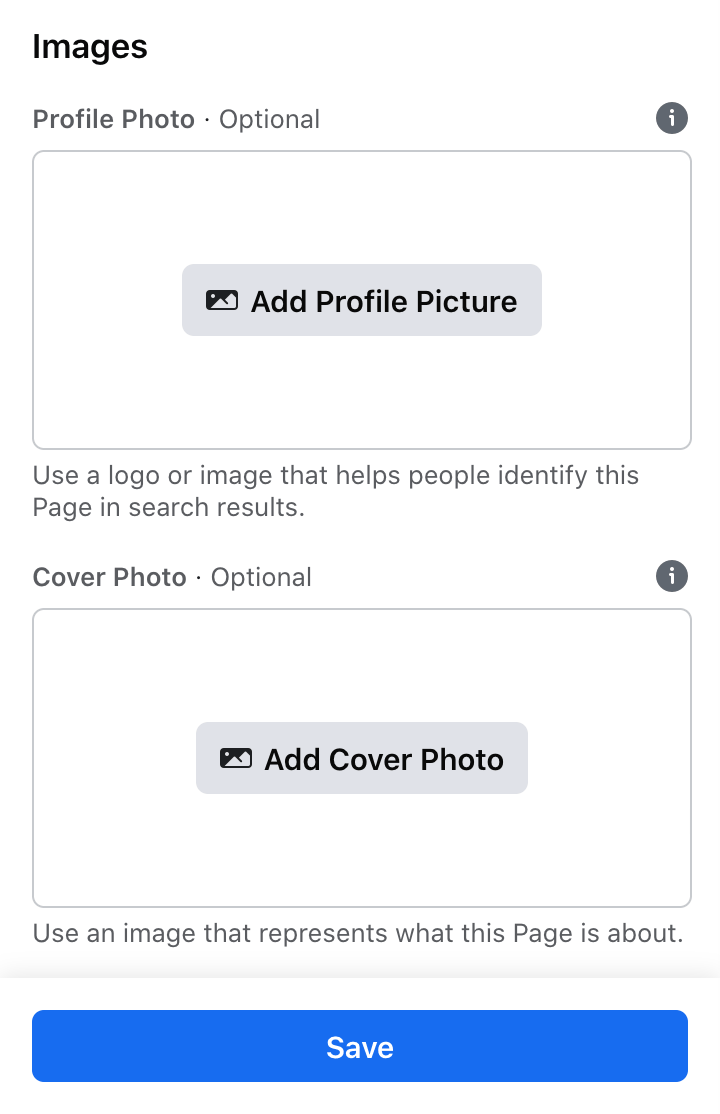
After clicking Create Page you should see a brief “Success” message, at which point two new fields will appear in the left column: Profile Photo and Cover Photo.
Follow these steps in order to create an optimized Facebook business page:
- Click on Add Profile Picture and upload a profile photo. Most businesses will use their company logo here, whereas individuals may use a headshot or other personal photo/image. Your profile image should be at least 170x170 pixels; however, for better results, you should upload a larger image.
- Click on Add Cover Photo and upload an image to appear at the top of your page. It should be at least 820x312 pixels. For better results, use a larger image and ensure you keep the same aspect ratio. e.g. 1640x624. Common practices are to use an image that invites the user to either click on it or click on the CTA button we will soon add below.
- Click on Save.
At this point, your Facebook page will be generated, and you’ll be given a first look at your new creation. There will be a number of obvious buttons you can click on throughout the page that will encourage you to add more information. Ideally, you should fill out every field as completely as possible - this is good for SEO but also for increasing visitor trust and understanding.
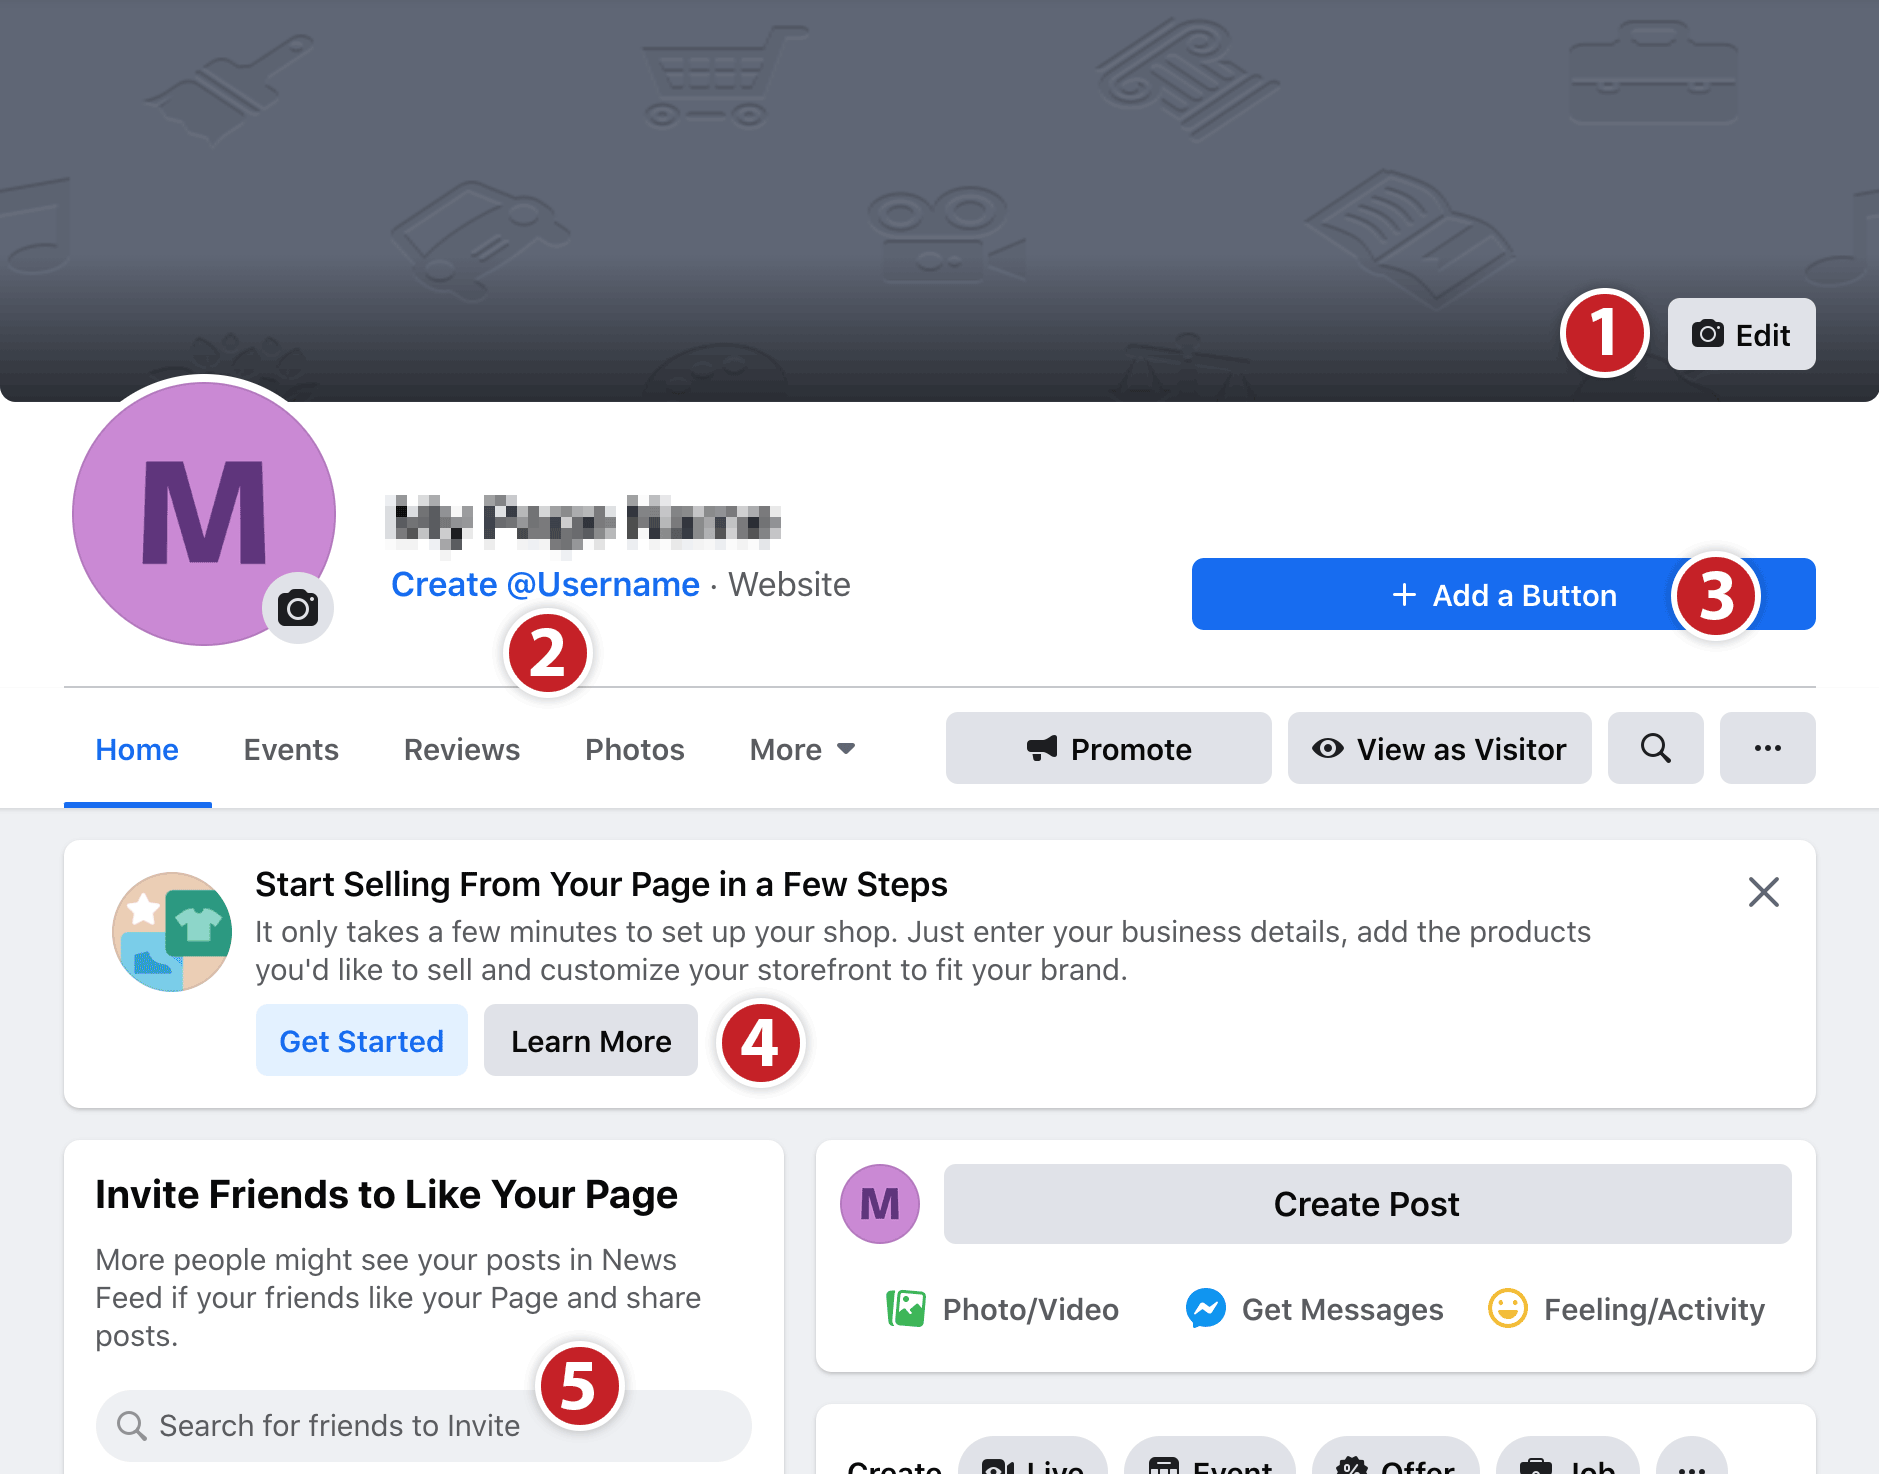
Each of the numbered boxes on the screenshot shown above highlights an area, link, or button you can use to optimize your Facebook page.
- The rectangular light gray area surrounding this box is where your cover image will display. You can edit it by clicking on the edit button shown. Once you are satisfied with the image, click on it. This will allow you to add a description of the image as well as an extra link to your website. Since clicking on the banner image is the first thing many people do when arriving on a Facebook page, this is a good place to feature a short company overview and your website link.
You can also use a cover video here, but if you go this route make sure it’s short and sweet!
- Clicking Create @Username will allow you to create a unique username for your page. A page’s username defines its URL, so your Facebook page’s permanent URL will be Facebook.com/username. You can’t use the same name as any currently existing page, and any characters other than numbers, letters, and periods will not work. Your page’s username must be at least 5 characters long and must comply with Facebook’s terms.
Sometimes you will not be able to change your page’s username right away. This essentially means that Facebook does not “trust” your page yet. Fortunately, there are a number of workarounds you can use to build this trust. Not all of these tactics are guaranteed to work, but in most cases, some combination of them should help.
- Wait a week or two and try again
- Add someone else as a page admin and have them change the username
- Get at least 10 page likes (in most cases this is the easiest and most effective option)
- The Add a Button button allows you to choose from a number of predetermined call-to-action button types to feature at the top of your page. Here’s a look at choices:
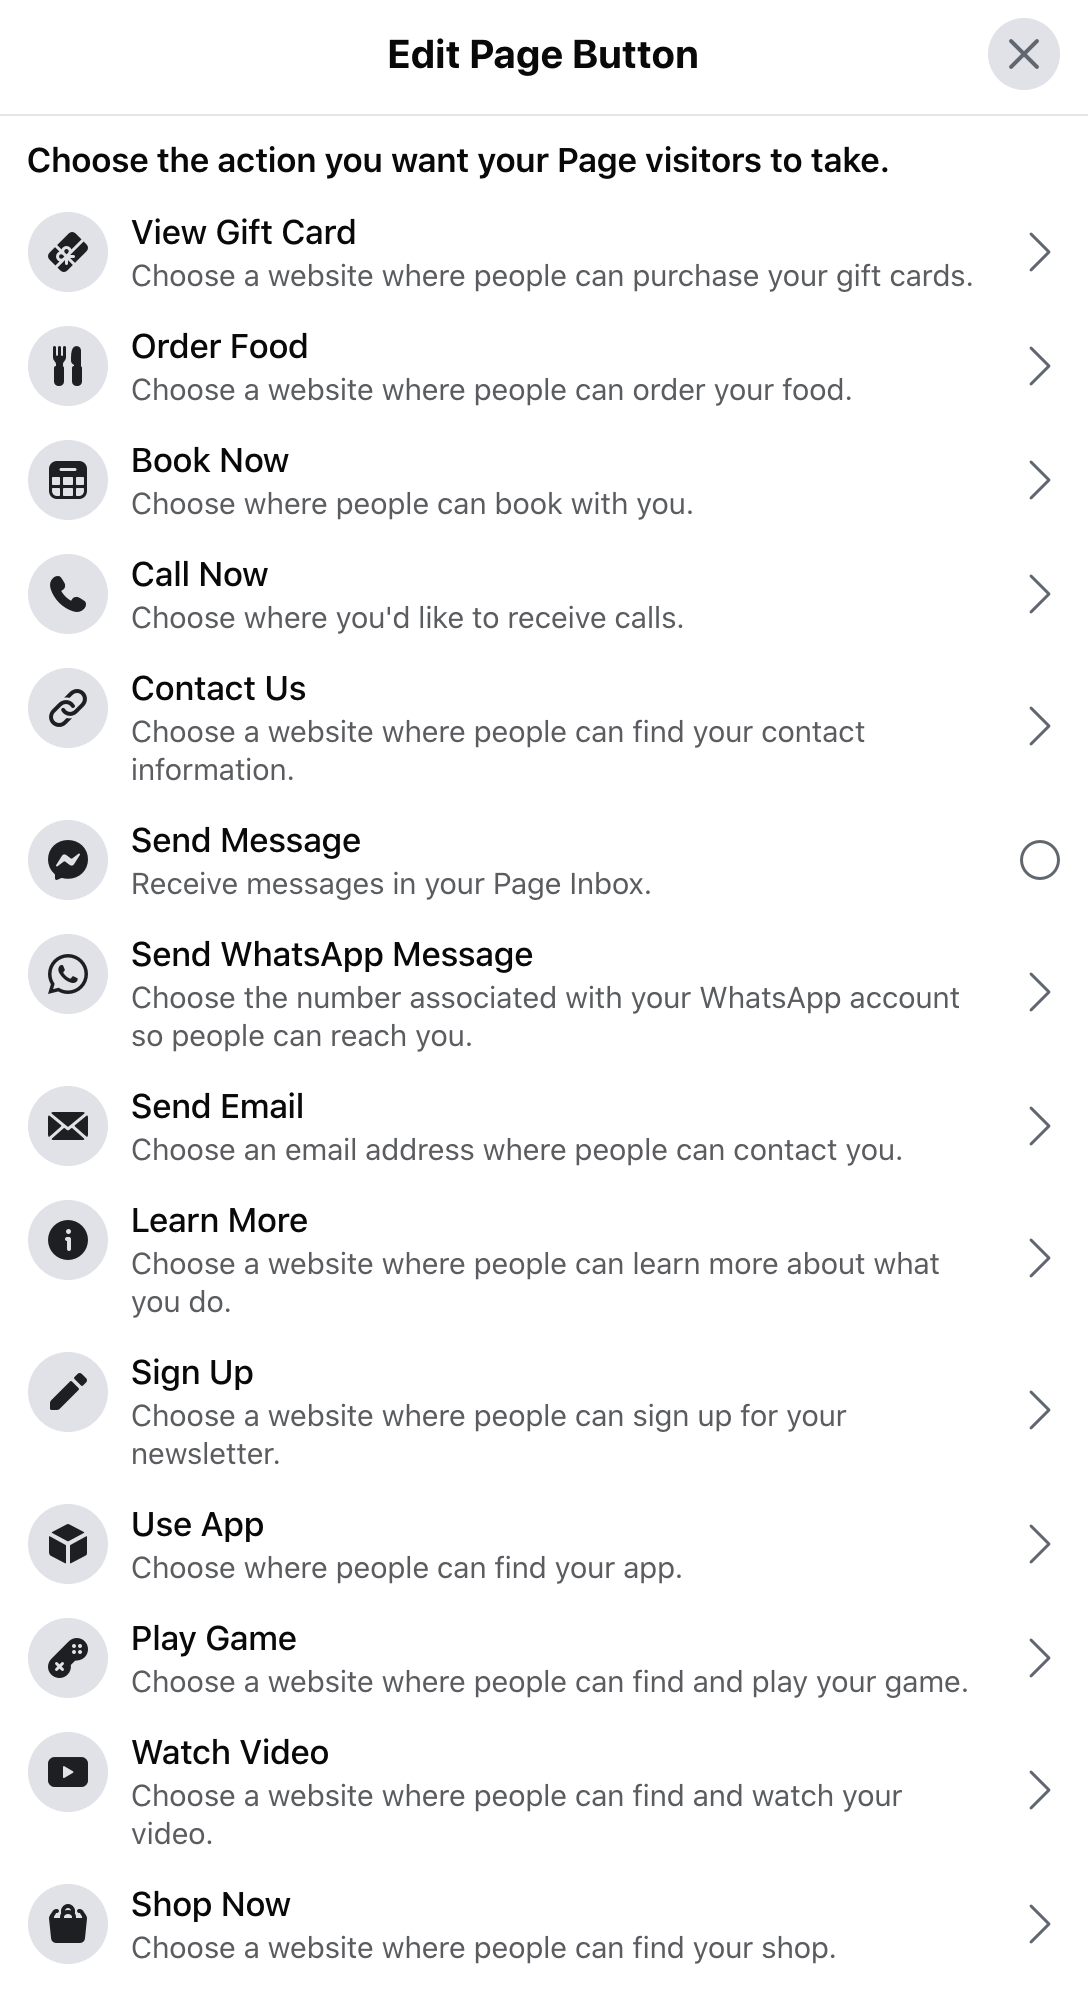
Learn More and Send Message are popular options, but your brand goals will determine which is best for your page. You can always change the button, so don’t hesitate to test out multiple options. Typically you will want to send your Facebook followers directly to your owned website.
- If you’re planning to set up a Facebook Shop, you can learn how to do so or start the process using these two buttons.
- The Invite Friends to Like Your Page section is pretty self-explanatory. Here you can search through your friends and invite them to like and follow your page. For best results, only invite people who fit your target market, essentially those who may actually be interested in the content you post. Likes and follows from people who never engage with your page are nothing but a vanity metric.
If you’re wondering “how do I get my first 10 likes?” or “what should I name my Facebook page?”, don’t worry! Let’s take a closer look at both of those subjects.
How to Get Your First 10 Likes
The easiest way to get 10 likes on a new Facebook page is to invite any friends who will be interested in the content you plan to post. But if you don’t have any friends who are interested in the topic, or if you don’t want to share the page with your friends, you may need to use one of the following methods:
- Find relevant Facebook groups that allow self-promotion. Post the link to your page at the appropriate time, and remember to give people a good reason to follow.
- Pull any other audiences you have to your Facebook page - if you have a following on another platform or an email list, consider inviting them to like your page.
- Run a boosted post or a brand awareness ad - it shouldn’t cost too much to increase your page visibility and attract your first 10 followers in this manner.
Once you have your first 10 likes/follows, you should be able to change your page’s username, and you’ll have a small audience to start sharing your story with.
How to Choose a Name For Your Facebook Page
Choosing a name for your Facebook page is similar to choosing a domain name. The best option, if it’s available, is usually the actual name of your business or brand. e.g. Web Hosting Canada. If that’s not an option, aim for something that contains a relevant keyword and accurately describes your business. When choosing your page username, you could use a short form of your business name or your site’s exact URL. For example, WHC’s Facebook page is called Web Hosting Canada, the username is WHC.CA and the URL is: Facebook.com/WHC.CA
What You Can Do With a Facebook Business Page
At this point, your Facebook page should be starting to look pretty good. But there is still MUCH more that you can do with the page’s built-in toolset.
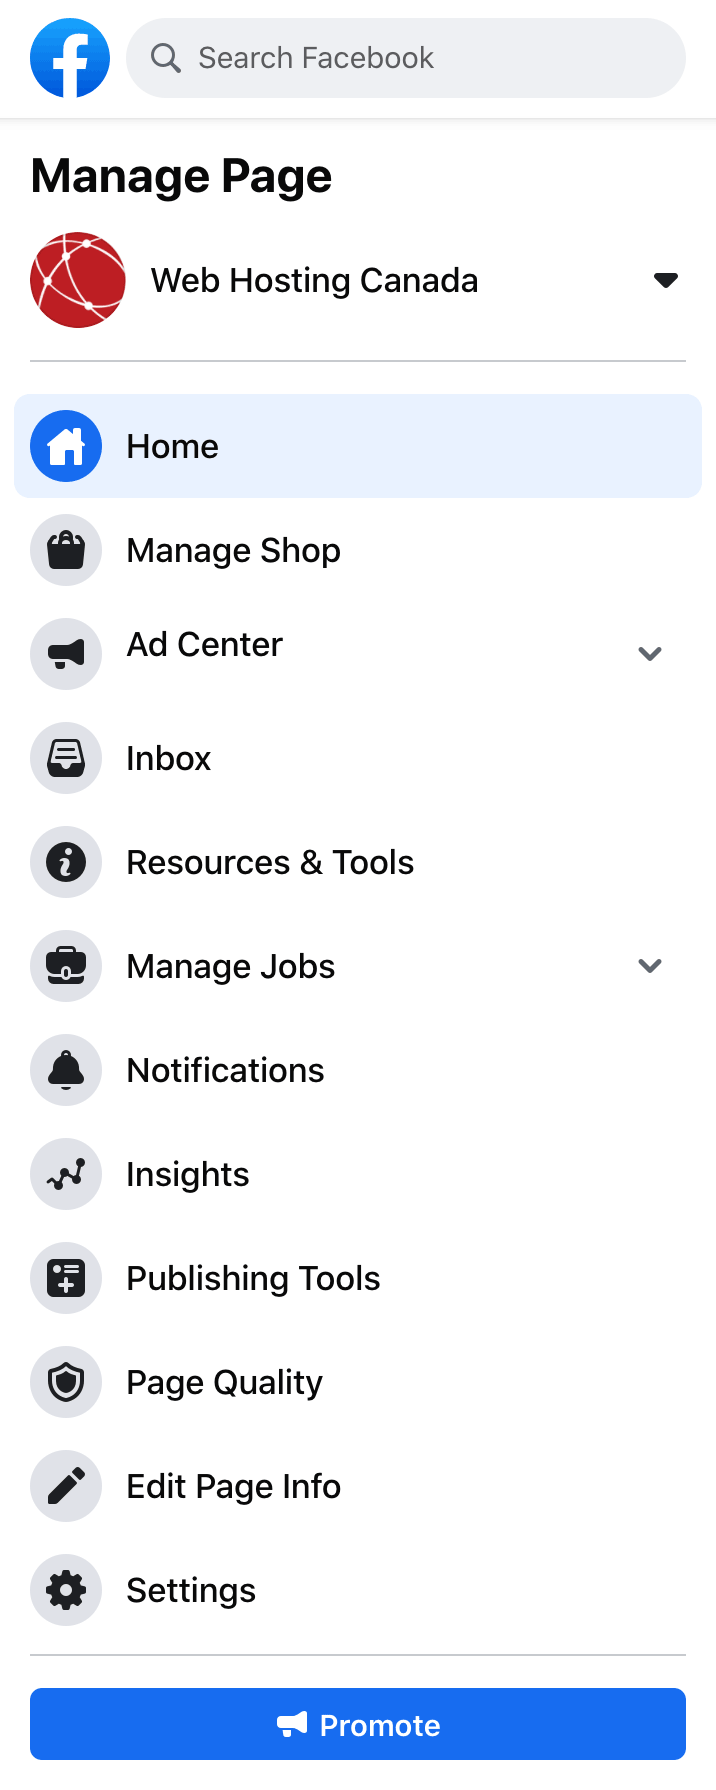
Manage shop
This option takes you to Commerce Manager, where you can set up an online store for your business.
Ad Center
Here you can create and manage boosted posts and page promotions. These are different from Facebook ads, which are accessible through the Ads Manager.
Inbox
This is where you can view and manage messages sent to your page by visitors.
Resources & Tools
This will send you to a different view of your page that includes instructions and links to tutorials.
Manage Jobs
Here you can connect to external hiring platforms, allowing them to display available jobs on your page.
Notifications
This tab allows you to view and interact with a list of recent notifications.
Insights
The Facebook Insights tab allows you to view insights and statistics associated with your page’s activity.
Publishing Tools
This tab takes you to the Publishing Tools page, where you can schedule posts, post in multiple languages, and create special types of posts including polls and watch parties.
Page Quality
If your page has any restrictions or violations against it, you’ll be able to find more information about them here.
Edit Page Info
This is where you can modify and add to the original information you included when creating the page. For best results, fill out as many sections as possible with complete information that matches the information found elsewhere on the web, like your own website.
Settings
This button opens a new sidebar menu that contains many powerful tools. It looks like this:
Here’s a brief overview of each tab:
Messaging
In the Messaging tab, you can define a number of messaging settings, including the use of automated messages. This is also where you can collect your page’s Facebook messenger link.
Page Info
This is the same tab as the Edit Page Info button available on the page itself. You can modify any of your page’s existing information here.
Templates and Tabs
Templates and Tabs give you some control over the look and functionality of your business page. Decisions made here can have a significant impact on your online presence - for example, will you allow customers to leave reviews on your Facebook page? Great reviews are an amazing way to build trust and authority, but poor reviews could hurt business.
Templates are predefined structures of Tabs which can then be edited to suit your needs. Tabs are the specific elements included (or excluded) on your page.
Event Ticketing
This is where you can connect an Eventbrite account, which will allow you to sell tickets to events directly on Facebook.
Notifications
In the Notifications tab, you can choose what you get notified about and how.
Advanced Messaging
Under Advanced Messaging, you can connect and manage apps to your business page’s messenger account, including but not limited to commercial chatbots.
Facebook Badges
Here you can turn Facebook Badges on or off. Badges are special identifying symbols that your followers can earn by, for example, being a top fan.
Page Roles
The Page Roles tab allows you to add and remove new users in a variety of roles, ranging from page owner to administrator to analyst. A well-coordinated social media marketing team can make use of each of these roles depending on how much access they need.
People and Other Pages
Here you can see which people and other pages like your page. This section can be important for understanding and maintaining your online presence, as you can also use it to ban users from interacting with your page.
Preferred Page Audience
This tab is being phased out and contains a link to Facebook’s help page - it will likely disappear soon.
Issue, Electoral or Political Ads
This tab lets you apply for authorization to run electoral or political ads, a new requirement for advertisers in selected countries.
Branded Content
This tab redirects to a separate page called Brand Collabs Manager. This is useful if you’re making posts that include other businesses on Facebook.
In this tab, you can connect or disconnect your brand’s Instagram account. Managing both Instagram and Facebook from one place can make you that much more available to your social network.
From this tab you can connect a WhatsApp business account to your Facebook page.
Featured
The Featured tab allows you to select other Facebook business pages to feature on yours. This is ideal for business partners or associated brands.
Crossposting
In this tab, you can establish a crossposting relationship with another page. Crossposting is a way to use videos across multiple pages. For example, you can share videos from their original posts rather than sharing each other’s pages.
Page Support Inbox
If you contact Facebook support, this is where you’ll receive their responses.
Payments
This is where you can set or view the currency associated with your page.
Page Management History
Page Management History is a long listing of every action performed by the page’s staff.
Activity Log
Here you can view extended activity logs from your page’s history.
So do you have your Facebook Business Page yet?
A Facebook page is a free and easy way to get your social media marketing started and can be an excellent tool to drive qualified and interested traffic to your own website. It can also play an important role in your digital marketing strategy, when used effectively.
Want to learn more about Facebook? This is the first article in Web Hosting Canada’s ongoing series on Facebook marketing, strategy and tactics. Follow us on Facebook in order to get updated when we post our next guide: How to get organic traffic from Facebook.
 About the author: Alex Tucker
Alex is a writer and digital marketer operating out of Ontario, Canada. He's passionate about health and wellness, self defense, and creating WordPress websites.
See all articles from this author Interested in writing for Web Hosting Canada?
Also on the WHC Blog
CentOS 6 End Of Life (EOL): Migrate Now!
What's happening? What is CentOS? When is the CentOS End of Life (EOL)? What happens once CentOS reaches EOL? Which services are affected? How can I tell which OS version I am using? What’s new in...
Read full article
New & Improved Windows Cloud Servers are Here!
Good news for all you Windows and ASP.NET users and developers out there: our Windows Cloud Servers plans have just received a well-deserved upgrade! Web Hosting Canada is proud to announce the immediate availability...
Read full article