One-Click WordPress Staging is Here!
Every time you make a change to a live website, you risk introducing an error that could cost you time and money, or harm your organisation’s online reputation.
Depending on the change, potential problems range from small visual glitches that will make your website display poorly on one or more web browsers, to bigger problems that cause your entire website to go offline or even get delisted from search engine results.
WordPress Staging from WHC is finally here to help you avoid these problems!
What is WordPress Staging?
WHC’s WordPress Staging is a solution that allows you to quickly, easily and securely execute and test changes to your WordPress website in a private location before they’re published on your live domain.
Changes you can test include:
- Posting a new blog article
- Changing your theme
- Adding or updating a plugin
- Changing your PHP version or configuration
Everything you can do on your live website, you can now do in your staging (or test) website!
WordPress Staging is included for free with the Pro & Beast Managed WordPress Hosting plans. It is available immediately in Beta mode from the WordPress section of your Client Area.
How can I Activate WordPress Staging?
Activating WordPress Staging with WHC is easy.
Start by connecting to your Client Area, and click into your WordPress service. Now, click on Staging,
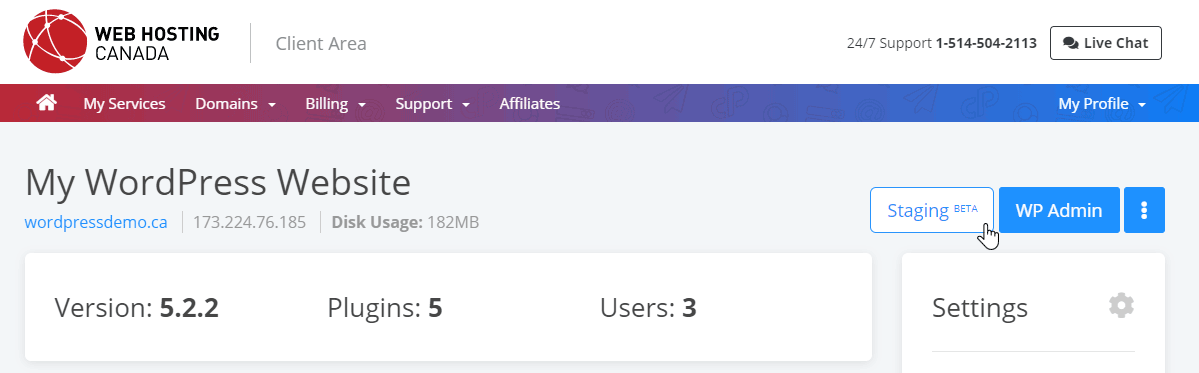
then click Create Staging Site to generate your first Staging environment.
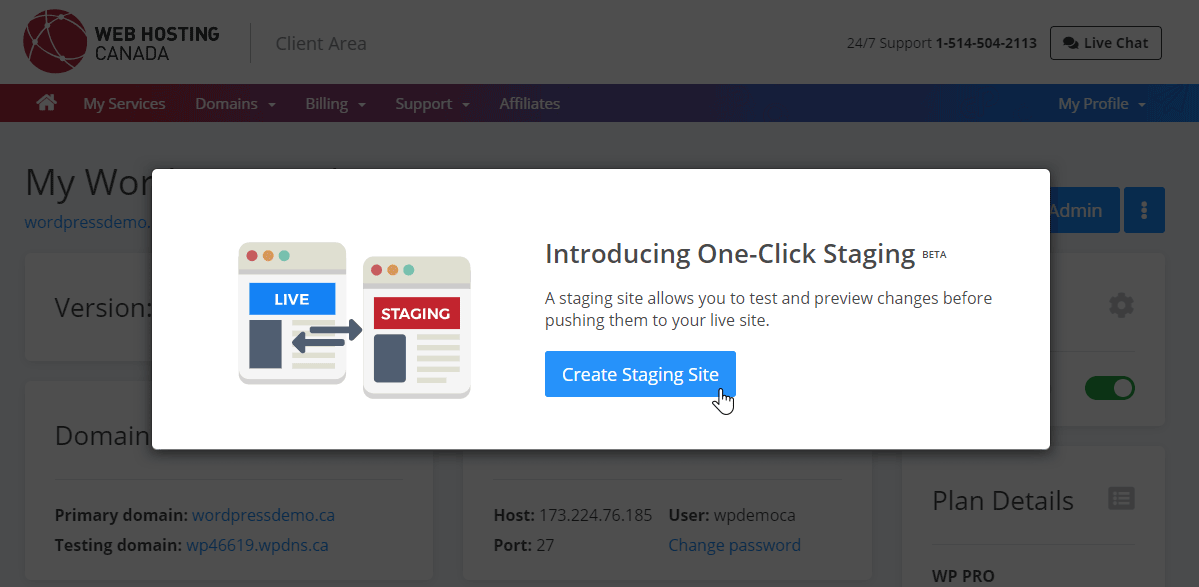
The Staging system will automatically copy all your WordPress files and WordPress database to a private website address, so that both environments have the exact same content. For smaller WordPress websites, this takes less than a minute!
To prevent duplicate content penalties, which could potentially harm your website’s ranking in search results, we’ll instruct search engines not to include your WordPress Staging site in their results.
Once the WordPress Staging environment has been fully set up, it’s ready for use!
How can I Use WordPress Staging?
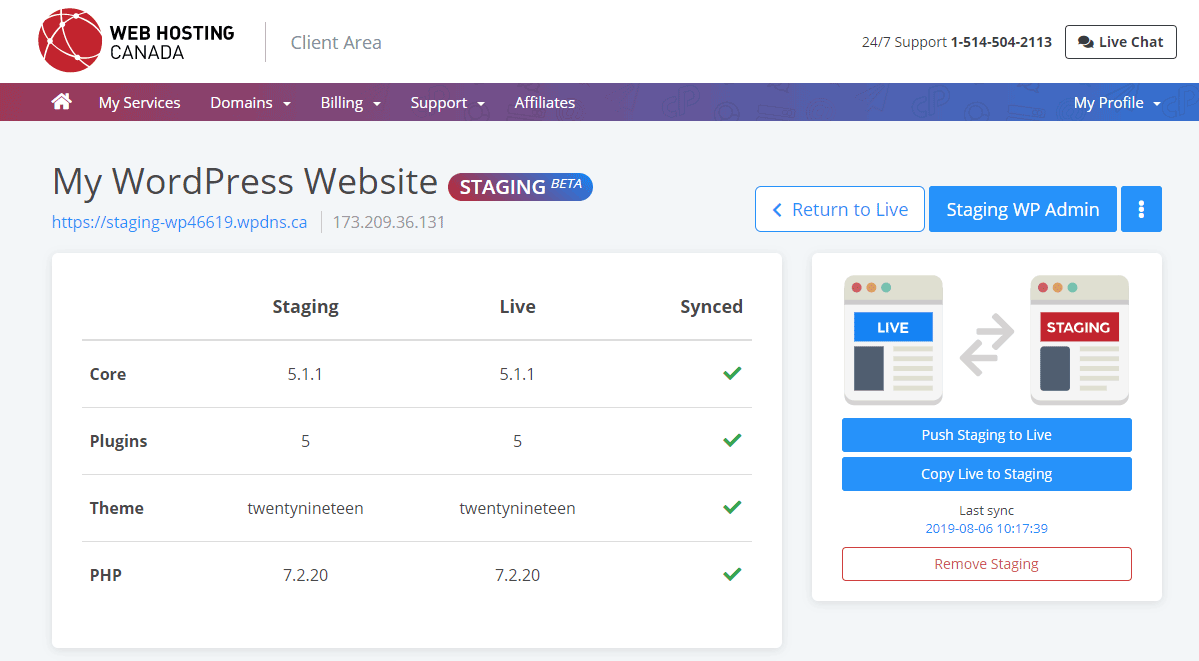
Once you’ve activated WordPress Staging, you can click on Staging to access your Staging dashboard. This dashboard will compare the configuration of your Live and Staging WordPress sites in real-time, to help keep things synchronized.
You can now log in to your Staging WordPress Admin by clicking on Staging WP Admin and make all the changes you need. You can also use the File Manager or SFTP to modify your files and themes, or even change your site’s PHP version or PHP settings.
When you’ve finished making your changes, you can test them by visiting your staging website’s private address.
Once you’ve finished testing your changes, it’s time to push them to your live website. Simply choose which direction you wish to synchronize changes in:
- Push Staging to Live to deploy the changes you’ve made from your test environment to your live environment.
- Copy Live to Staging to update your test environment with your live content.
Then, choose what to copy:
- Everything will copy files, folders and database. This will be the most common option for most users.
- Files Only will copy files and folders, but not the database. This is a useful option if, for example, you’ve made some style changes to your themes but don’t want to override recent activity on your Live website.
- Database Only will copy the database, but not the files. This is the least common option but can be useful if, for example, you’ve modified files on your Live environment and only wish to push a change you’ve made on one of your Posts.
Now click Start Sync to begin the automatic copy process. On small websites, this will normally finish in under a minute. On larger websites, it can take upwards of 30 minutes. Either way, we’ll send you an email once it’s done!
If you’re happy with your update, pat yourself on the back; you’re done! In the unlikely scenario where you uncover issues following an update, your account backups are there to help you revert any changes quickly and safely.
Adopt Staging as Part of Your Deployment Process
If you’re a WordPress professional, a developer, or a webmaster in an agency, you should never make changes to your live website directly. There’s just too much that can go wrong.
Using Staging as part of every deployment will reduce errors and will keep clients and website visitors happy.
With Staging, you’ll see a side-by-side comparison of both environments and you’ll be able to synchronize them continuously. If needed, you can disable automatic updates in production, enable them only in staging, and synchronize changes only after having tested them first.
If you’re a developer, you can take things one step further by using source-control systems like GIT to version control your changes and easily track or revert updates with your development team. More about GIT and version control in a later article!
Test Your Website Changes Like a Pro
Testing changes made to your website should follow a thorough, step-by-step approach in order to minimize potential problems. Here are some steps to follow:
- Visually inspect the main pages of your website in Staging
Consider maintaining a list of core URLs to test before and after your changes. Save this list in a spreadsheet and test each one by creating and saving screenshots.
-
Test your website across multiple browsers:
- Google Chrome
- Mozilla Firefox
- Safari (on Mac)
- Microsoft Edge
-
Test your website’s responsiveness on mobile:
- iPhone / iPad / iOS
- Android devices
- Try resizing your browser screen on a full-sized computer screen and observe the behavior of your page. Remember: there are hundreds of popular screen sizes! Your site should render correctly on all popular resolutions.
-
Test dynamic pages:
- Page speed load times: Is your site slow or sluggish following your update?
- Contact form: Does the email get delivered?
- Order form: Is the correct pricing being displayed?
- Admin login: Are you still able to log in?
- Website login form: If you have a members-only section, does the authentication work?
Stay Calm and Use Staging
WordPress Staging removes uncertainty from your WordPress deployment process. It helps ensure both your clients and your visitors enjoy a smooth, stable experience throughout your website’s lifecycle.
WordPress Staging is included with WordPress Hosting plans and is already integrated seamlessly in your Client Area. If you haven’t already, sign up now!
Happy WordPress-ing!

 About the author: Emil Falcon
Emil is WHC's Founder and CEO. When he’s not busy obsessing about things such as optimizing workflows or enhancing system performance, security and reliability, he’s spearheading initiatives that can help entrepreneurs and businesses succeed across Canada.
See all articles from this author Interested in writing for Web Hosting Canada?
Comments
Leave a Reply Laisser un commentaire
Leave a Reply Laisser un commentaire
Also on the WHC Blog
WordCamp Montreal 2019: Here’s what You Missed!
The WHC team was excited to be a gold sponsor of WordCamp MTL 2019. We’ve got the round-up of what went down this past weekend at the event, in case you missed it! 2 Days. 45 Presentations. 17 Sponsors. 400 Attendees. With...
Read full article
Beginner’s Guide to Off-Page SEO & Link Building
In part four of our ongoing series, SEO for Beginners, we look at ways to improve your ranking through other websites and social media. What Is Off-Page SEO? What are Backlinks and Why are They Important? What are...
Read full article
good morning I have just moved our site with you it is done with word press but my plan is not word press. I wan to create a new site but keep this one running until I am finished as I have never used word press and it is new to me. Is this the steps I take to do this or can it be done just on my computer without being on WHC.
Thank you
Hi Roberta, the steps outlined here are only applicable if you use the Managed WordPress service with WHC. Otherwise, you’ll perhaps want to create your website in a subdomain and migrate it once you’re happy with the result by contacting our support team.
Can you recommend a plugin that provides staging functionality to WP websites that are hosted by WHC but are not Managed WordPress sites?
Hi David,
Unfortunately we cannot recommend any suitable plugins to you at this time.
You may want to do some research on which ones may be available, with the kind of features you’d be looking for.
Honestly speaking, we couldn’t find a solution that had the features we needed for our own website changes and updates, which is why we created our very own.
For this reason we can only recommend our Managed WordPress package, and not any existing plugins you may find through WordPress.