Get Started with WordPress in 8 Easy Steps (2023)
WordPress is the world's most popular content management system because it’s incredibly versatile, easy to use and open-source. Much more than just a blogging platform, WordPress is also a popular eCommerce platform. According to W3Tech, WordPress powers over 33% of all websites in the world, from small business to government websites, and everything in between.
In this guide, we’ll walk you through the most important steps to get your first WordPress website online, so you can hit the ground running!
- 1. Pick a Domain and a Hosting plan for WordPress
- 2. Install WordPress
- 3. Log in to Your WordPress Dashboard
- 4. Choose a WordPress Theme
- 5. Create Your WordPress Content
- 6. Add a Navigation Menu
- 7. Add Neat Features with WordPress Plugins
- 8. Promote your WordPress Website

1. Pick a Domain and a Hosting plan for WordPress
Before anything else, your WordPress installation will require a domain name as well as a hosting plan.
If you don’t already have a domain name, have a look at the Canadian Guide to Finding Your Perfect Domain Name for essential tips, then register your great new domain name.
If you don’t already have a hosting plan, consider reading How to Choose a Web Hosting Company and review our Web Hosting plans.
For a streamlined experience, we recommend our Managed WordPress Hosting, which comes with WordPress pre-installed and pre-configured, so you can hit the ground running!

2. Install WordPress
Before you can use WordPress you need to install it. Most providers offer simple 1-click installation tools to help with this. With WHC’s web hosting plans, easily install WordPress with the 1-click Apps Installer.

3. Log in to Your WordPress Dashboard
Your WordPress Dashboard is where you’ll be able to manage your website and its contents. There are 2 ways to access your dashboard:
- Type yourwebsite.com/wp-admin (replace yourwebsite.com with your domain name; for whc.ca it would be whc.ca/wp-admin) into your browser’s address bar and log in with your WordPress username and password
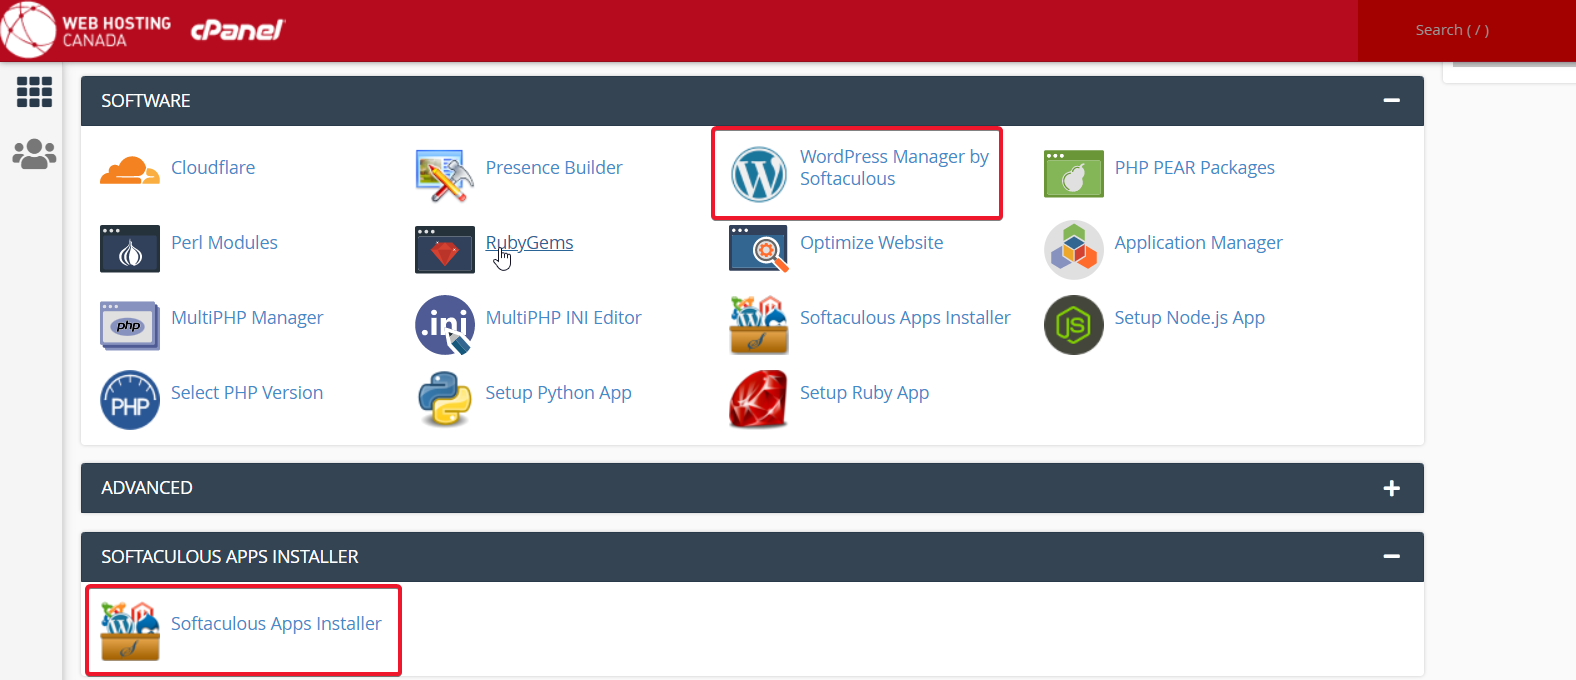
- Log in to cPanel (see How to access cPanel), then scroll down to the Software section, and click WordPress Manager by Softaculus. Alternatively, you can click on Softaculous Apps Installer
- You will then see your installation listed, simply click Login to access your site.
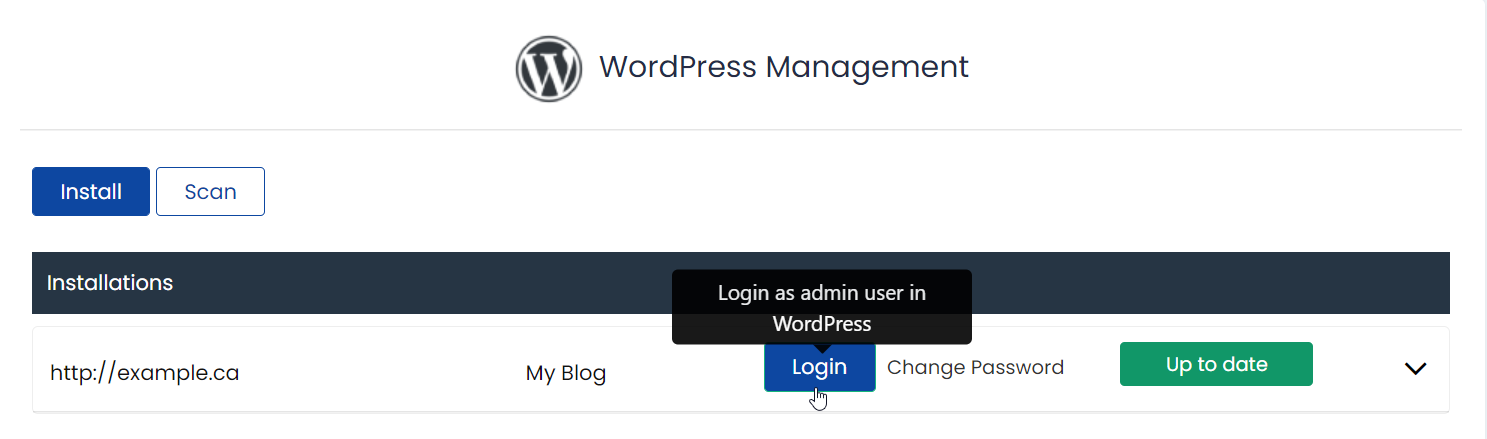
- You will then see your installation listed, simply click Login to access your site.
Now that you’re in, let’s get to the fun stuff!

4. Choose a WordPress Theme
A WordPress theme is a set of visual styles that will affect how your website looks and feels to your visitors. With thousands of available themes, picking one that you like and that enhances your site’s content is key. Changing your theme will change the look of your website without changing its content, so feel free to experiment!
To change your current theme from the WordPress Dashboard:
- In the menu, click on Appearance, then Themes.
- Here you’ll see a list of the themes you already have installed (though only the one you are using will be activated)
- To add a new theme, click Add new at the top of the page
- Browse through the themes by scrolling through the available themes or by searching for specific words using the Search box
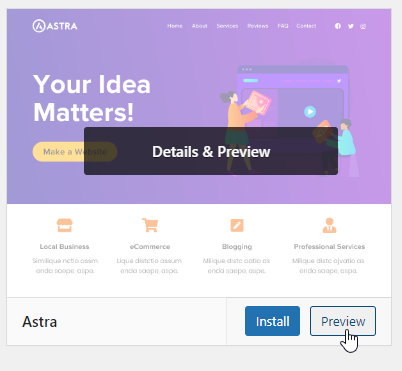
- Once you find a theme you like, hover over its image and click Preview (or Details & Preview) to see what it looks like before installing it. If you like what you see, click Install
- Wait a few moments while the theme installs, then click Activate to make it your live theme on your website
- Depending on the theme you’ve chosen, some additional customizations could be required. Follow the on-screen instructions to finish personalizing your theme, and don’t forget to view your website to see how it looks to visitors.
Not sure which theme to choose? Learn how to pick a theme in WordPress in 6 easy steps.

5. Create Your WordPress Content
A great website needs great content. With WordPress, content is placed inside Pages or Posts.
Pages are used for timeless content that’s not meant to be ordered or seen based on its publication time. Pages can usually be accessed from your website’s main navigation menu. Some examples of Pages include: About us, Our Services, or Privacy Policy. Most of your primary content will be in Pages.
Posts are similar to Pages, except that they can be ordered based on their date of publication and categorized by topic, to make them easy to sort through. Posts can be found through the Blog or News section of your website, or by using the search feature. Examples of blog posts include Getting Started with WordPress in 8 Easy Steps. You won’t find this post in the WHC website’s navigation menu, but you will find it on the Blog.
Define Your WordPress Homepage
The first page visitors to your website will see is called your Homepage. Depending on the theme you are using, your homepage may be configured by default to display the latest blog posts. Since you’re probably just starting your website and don’t yet have any blog posts to show, let’s switch your homepage to a more traditional format using a Page.
Here’s how:
- In the WordPress menu, click Pages, then Add New
- Type in a title, or just “Home” if you’re out of ideas
- Click Publish in the upper right corner
- Go to the Settings section in the dashboard and click Reading
- Next to Your homepage displays select A static page
- Use the Homepage dropdown menu to select the page you just created (in our example: “Home”)
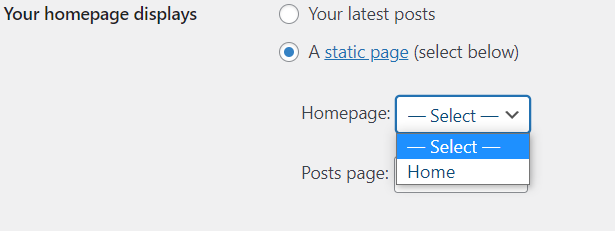
- Click Save changes and you’re done!
Now you have a homepage ready and waiting for your creative input.
Update Your WordPress Pages
Adding or updating page content is easy with WordPress, using the block-editor interface.
Here’s how to update an existing page:
- In your WordPress Dashboard menu, click on Pages > All Pages
- Click on the page you want to update to access its Editor Mode
- Within WordPress’ Editor, use the + icon to add new elements to your page
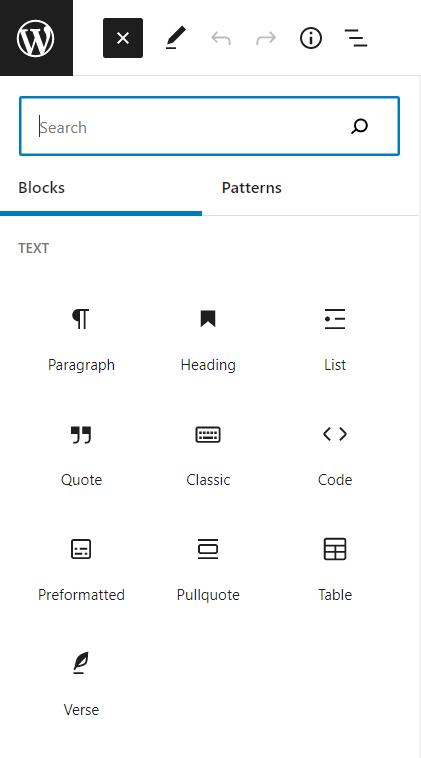
You can use it to add text, images, image galleries, headings, and more!
WHC’s Managed WordPress Hosting uses the Elementor editor by default instead of Guttenberg, giving you more flexibility in the type of content you can use. - For your changes to take effect, click the Update button when you’re done
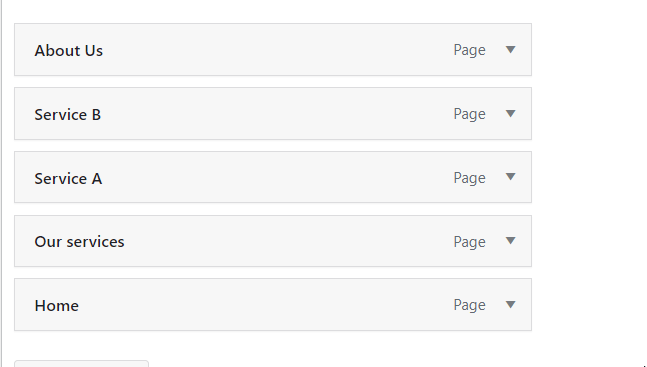
Create Additional Pages in WordPress
A website is usually more than just a homepage. For example, you may want to add an About Us, Contact Us and Our Services page.
To create additional pages simply click on Pages, then Add New, and save your new pages with unique, descriptive names. Then edit those pages just like you did your homepage.

6. Add a Navigation Menu
Now that you have multiple pages it will be useful to show a navigation menu so your visitors can easily find their way around your website.
The menu can be created and modified in 8 simple steps.
- Go to the Appearance section of the dashboard and select Menus
- Create your menu by entering a Menu Name
- Tick the place you want your menu to appear within the Display locations
- Click Save Menu
- Under Add menu items, click Pages then click the View All tab
- Select all the pages you wish to be part of your menu and click Add to menu
- Adjust their order by dragging each menu item to its desired location (top being first and bottom being last)
- Click Save Menu and you’re done!

7. Add Neat Features with WordPress Plugins
Most cool features you’ll want on your website and that aren’t provided through the base WordPress installation can be obtained through the use of a plugin. With more than 8000 plugins, there are lots of ways to spruce up your site. Examples include creating contact forms, increasing security, adding language switchers, and showing detailed visitor statistics.
To discover and add WordPress plugins:
- In the WordPress Dashboard, click on Plugins and Add New
- Search plugins using the search bar in the top right corner or browse through Popular or Recommended plugins at the top
- Click Install Now to install a plugin
- Click Activate to activate a plugin on your website
- Manage your plugin’s settings through the Plugins > Installed Plugins menu. Locate the column called Plugin and click on Active or Deactivate.

8. Promote your WordPress Website
Once you have a basic website ready to go, you will want to get the word out.
Get Your WordPress Site listed on Google
Manually submit your site to Google so you can get listed in their search results faster. Use your Google Account to sign into Search Console and submit your new site at the top of the page.
Promote your WordPress Site on Social Networks
Another way to let people know about your site is to create social media pages for it on Facebook, Linkedin, Twitter and Instagram. This way there are other avenues for people to find you and you can post about updates to garner interest.
Congratulations, you’ve covered the WordPress Basics!
You now know the basics on how to pick a theme, create a menu, add content, use plugins and promote your new WordPress website. Way to go! Equipped with this new know-how, you’ll be joining a community of millions of website owners, entrepreneurs, and enthusiasts that appreciate using open-source software to power their websites and businesses online. To improve your WordPress skills, keep an eye out for WordCamp conferences or WordPress MeetUps happening in an area near you, as well as WordPress Forums. And if you need a helping hand with a specific question along the way, the friendly WHC support team is available 24/7 to assist you.
Happy WordPressing!
 About the author: Marc Pilon
Marc is a SEO Copywriter, Research Analyst, Marketer and Boardgame Wizard at WHC. He focuses on everything from developing new online growth strategies, content creation, technical SEO, and outreach within the community.
See all articles from this author Interested in writing for Web Hosting Canada?
Also on the WHC Blog

Some Prices Are Going Up in Dec 2022
We’re ending 2022 with a price increase for a subset of our services, and believe us, we absolutely hate it. Thankfully, this affects only a subset of our clients using cPanel and those using a dedicated IP. Details...
Read full article
Does my website need a dedicated IP?
If you have or manage a website, you’ve probably heard of a Dedicated IP Address. But what is it exactly? And more importantly, can your website benefit from a dedicated IP? Since online knowledge is power, we’ll...
Read full article