
How to Add CAPTCHA to WordPress Contact Forms
Contact forms are a great tool to increase website engagement, and WordPress provides simple plugins to help you add one to your website. But without adequate protection, they can be quickly overwhelmed with spam. In this article, you’ll learn how to add a security feature called CAPTCHA to protect your WordPress contact forms. Adding CAPTCHA (or in our case reCAPTCHA) to a WordPress contact form takes only a few minutes, but it can save you a big headache in the long run.
Not convinced that you need a contact form? In that case you may want to read 4 Great Reasons to Use a Contact Form On Your Website. If you have one and it isn't converting well, consider implementing our Tips For Increasing Contact Form Engagement. And if you feel overwhelmed by the number of options, we've got you covered with our article on The Best WordPress Contact Form Plugins.
Once you have all that figured out, you'll want to make sure that your contact form is equipped with CAPTCHA.
- What Is CAPTCHA and Why Is It Important in WordPress?
- How to Get Your Site Key and Secret Key for ReCAPTCHA
- How to Add CAPTCHA to Forminator
- How to Add CAPTCHA to Contact Form 7
- How to Add CAPTCHA to Ninja Forms
- How to Add CAPTCHA to WPForms
- How to Add CAPTCHA to Other WordPress Forms
- ReCAPTCHA + WordPress Contact Forms = A Winning Combo!
What Is CAPTCHA and Why Is It Important in WordPress?
A CAPTCHA is a program intended to tell the difference between humans and robots - in this case spam bots that crawl the web looking for unprotected contact forms. CAPTCHAs typically work by devising a kind of test or trap that humans can easily bypass, but that robots cannot. Because spam bots are always evolving, CAPTCHAs have adapted as well. An advanced version of CAPTCHA developed by Google, called reCAPTCHA, is a free add-on to any website and is capable of preventing most spam attacks.
Because WordPress contact forms usually work by sending the entry to either your website database or your inbox (or both), preventing spam in WordPress contact forms is of particular importance. No one wants to wake up to an overflowing inbox, or a database that has suddenly tripled in size! Keeping your contact form secure from spam bots will ensure that you don’t have to waste any time and energy cleaning up after them.
How to Get Your Site Key and Secret Key for ReCAPTCHA
In order to add reCAPTCHA to any website, you first need to get a site key and secret key from Google.
- Go to https://www.google.com/reCAPTCHA/admin/create. Here’s a screenshot of the Google CAPTCHA creation page, so you’ll know what to expect:
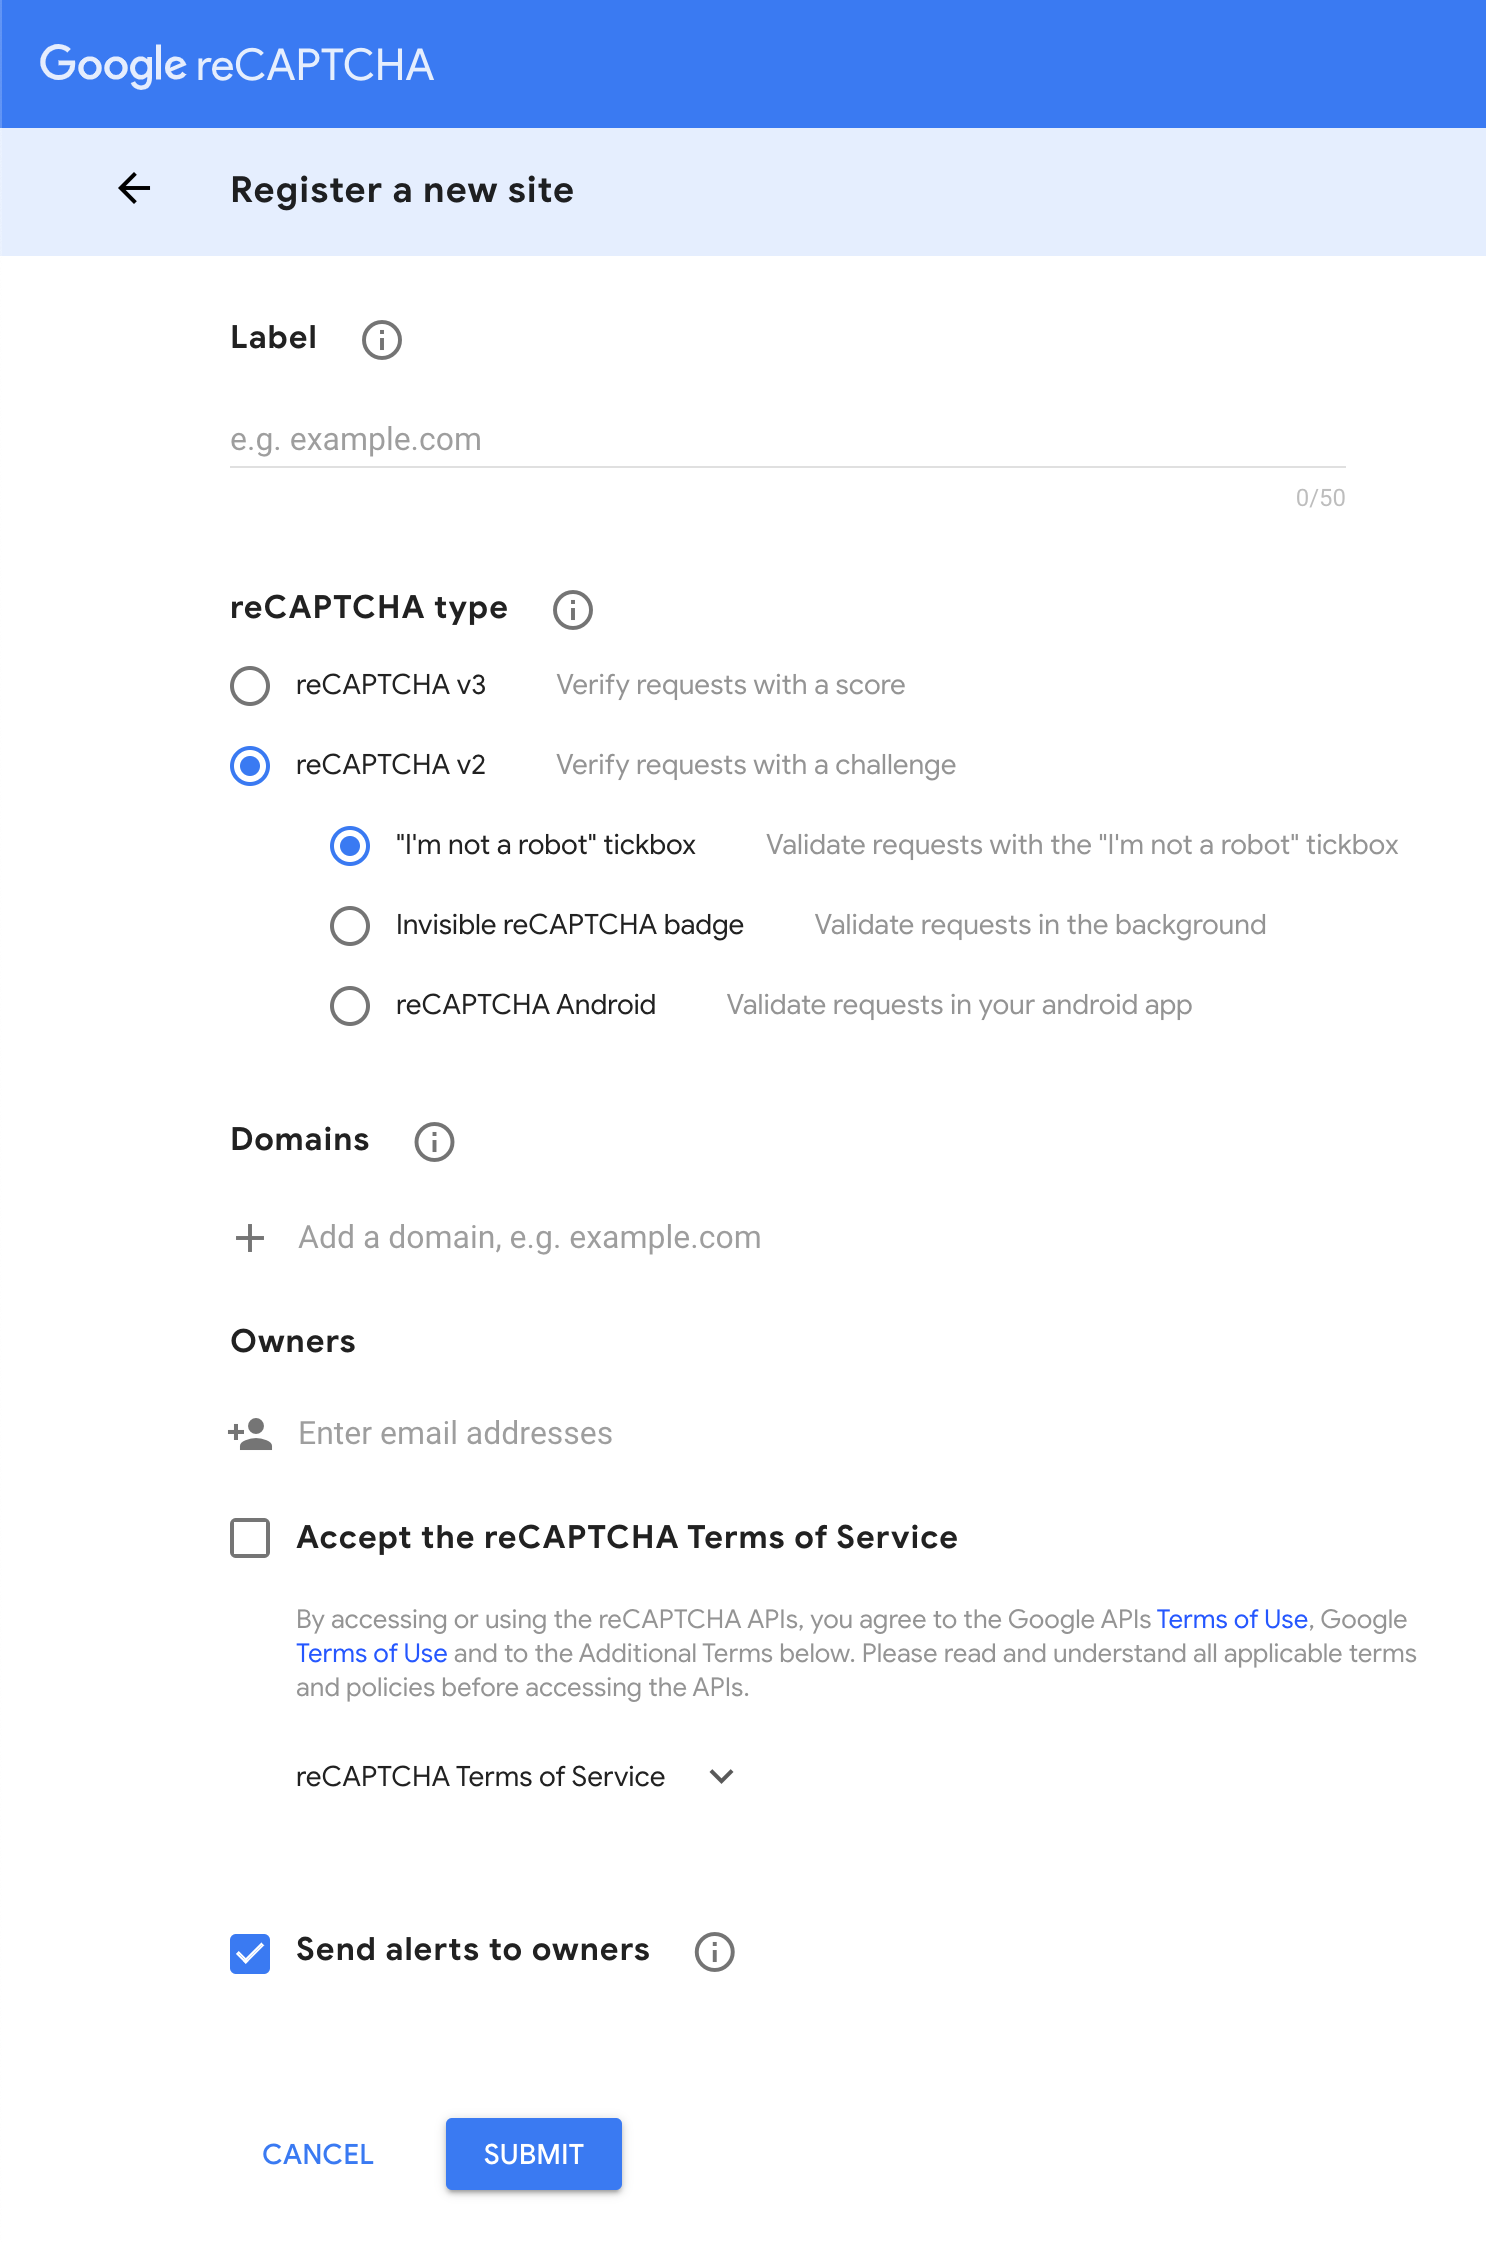
- Fill out the information in the required fields and select the type of CAPTCHA you’d like to use. For the purposes of this article, we’ll use the v2 "I’m not a robot" reCAPTCHA.
- Click Submit
- You’ll be taken to a new page containing your Site key and Secret key for the reCAPTCHA.
Now that you have the site key and secret key, you're ready to integrate reCAPTCHA with your website. You can use the same site key and secret key anytime you want to add CAPTCHA to any other plugins or elements on the site. Let's look at how to use CAPTCHA on some popular contact form plugins, and then we'll explore how to integrate it with any other form element.

How to Add CAPTCHA to Forminator
Forminator was our top rated contact form plugin in a previous article, and one of the reasons it rose to the top was how easy it is to set up and use. Setting up a CAPTCHA in Forminator is very similar to setting it up with Advanced NoCAPTCHA, but we’ll do a quick walkthrough of the process anyway.
- Install and activate Forminator, then click on the plugin’s name in the left sidebar to access its main menu.
- The menu in the sidebar will expand, allowing you to click on Settings.
- From the Forminator settings page, click on Google reCAPTCHA.
- Select the appropriate type of CAPTCHA and fill out the Site key and Secret key as before, then click on Save Settings.
That’s it! Now reCAPTCHA will be available as a field you can easily add to any form.

How to Add CAPTCHA to Contact Form 7
- Install and activate Contact Form 7.
- Click on Settings from the plugin menu or Contact in the left sidebar to access the full CF7 menu.
- Click on Integration in the sidebar, and then Setup Integration under reCAPTCHA.
- You’ll be presented with a screen that should look familiar by now - here you can enter your Site key and Secret key, and click Save Changes.
That’s it! Contact Form 7 automatically uses Google reCAPTCHA v3, which is invisible to human users so it doesn’t interrupt the user experience at all. Once this setting is enabled, your Contact Form 7 forms will be protected by invisible reCAPTCHA.

How to Add CAPTCHA to Ninja Forms
- To set up CAPTCHA with Ninja Forms, install and activate the plugin.
- Click on or mouse over its name in the left sidebar.
- Click on Settings.
- This is where you enter your Site key and Secret key to activate reCAPTCHA for Ninja Forms.
- This plugin also requires that you enter a language code. The code is en for English and fr for French. To find codes for other languages, you can click on the link provided by Ninja Forms below the language field.
- Select a theme, and then scroll down and click on Save Settings.
That’s all for Ninja Forms! Similar to Forminator, Ninja Forms will now make a “reCAPTCHA” block available to you in its drag-and-drop builder.

How to Add CAPTCHA to WPForms
By now you’re probably pretty comfortable with adding CAPTCHA or reCAPTCHA to a WordPress form, but we’ll cover one more popular example in WPForms.
- Once you’ve installed and activated the plugin, mouse over or click on its name in the left sidebar and go to Settings.
- You’ll be taken to a WPForms branded page with a menu that includes a reCAPTCHA tab. Click on it, and you’ll arrive at the screen where you can input your Site key and Secret key.
- You can select the type of reCAPTCHA you want to use, and also set a custom fail message before clicking on Save Settings.
- WPForms also includes an option called no conflict mode, which can help prevent issues with other instances of CAPTCHA on the same page.
Like Forminator and Ninja Forms, once you’ve enabled reCAPTCHA for WPForms it becomes an addable element when creating or editing a form.
How to Add CAPTCHA to Other WordPress Forms
Although most popular contact form plugins have CAPTCHAs built into their functionality, it’s also possible to manually add CAPTCHA to any form element on WordPress that’s being abused. These include contact forms, but also comment forms, login pages, and optin forms. For this we’ll use the Advanced NoCAPTCHA and Invisible CAPTCHA plugin.
- Install and activate the plugin from the WordPress repository.
- When you’re redirected to the plugins menu, click on Settings under Advanced NoCAPTCHA and Invisible CAPTCHA.
- Copy and Paste the Site key and Secret key into the appropriate fields on the Advanced NoCaptcha and Invisible CAPTCHA plugin page.
- Configure the rest of the options as you feel is appropriate - for this tutorial, I just checked the comment form box next to enabled forms, and left everything else at its default.
- Once you’re sure you’ve set things up correctly, scroll down and click on Save Changes.
- Now have a look at one of your blog posts.

As you can see, the Google reCAPTCHA has now been integrated with my website’s comment forms.
ReCAPTCHA + WordPress Contact Forms = A Winning Combo!
By now you should understand what a CAPTCHA is and what it does. You should also know why it’s important to a WordPress website, and how to add it to any form with just a couple of clicks. Configuring it correctly will cut down on the amount of spam you receive significantly, saving you valuable time. If you know someone whose WordPress website is suffering from an abundance of spam, be sure to direct them to this article!
Thanks for reading! If you have any questions about CAPTCHAs in WordPress or would like to see a specific plugin added to this tutorial, let us know with a comment.
 About the author: Alex Tucker
Alex is a writer and digital marketer operating out of Ontario, Canada. He's passionate about health and wellness, self defense, and creating WordPress websites.
See all articles from this author Interested in writing for Web Hosting Canada?
Comments
Leave a Reply Laisser un commentaire
Leave a Reply Laisser un commentaire
Also on the WHC Blog

5 Small Business Tips For Going Green in 2020
It's no secret that environmental issues are important to Canadians. In fact, 50% of Canadians say they will not consider a political party unless the party has a commitment to fighting climate change. But as a small business,...
Read full article
Beware of Coronavirus Scams!
The Coronavirus is not the only pandemic raging across the globe. Fear and greed, referred to by legendary investor Warren Buffett as “super contagious diseases”, are both running rampant as well. You’ve probably...
Read full article
Thanks for finally talking about > How to Add CAPTCHA to WordPress Contact
Forms | Web Hosting Canada canadian online pharmacies