Web Hosting Canada

Archives

How (and why) to Create and Install a Facebook Pixel on Your Website

If you’re using Facebook ads to promote your business, there is one essential tool you should consider: The Facebook Pixel. It gives you the ability to maximize the efficiency of your promotions, target highly specific audiences, and get the most out of your ad budget. Let’s take a look at how it works!

What is a Facebook Pixel?

The Facebook Pixel is a piece of code that you place on your website. It collects data that allows you to monitor conversions from Facebook ads, track the effectiveness of your ads, build targeted audiences for future ads, and even target people who have previously interacted with your website. It works by installing a tracking cookie that collects data about your website visitors so you can reach out to them later via retargeting. Additionally, you can track their behavior when they return to your site, which helps you to determine which ads are the most effective. It also allows you to target the most relevant audiences, who are most likely to convert!

What Does a Pixel Track?

You can use a Facebook pixel to track data events. An “event” is simply a specified action that a visitor takes on your website, such as making a purchase. Facebook has predefined a set of 17 standard events, as follows: Add payment info: A visitor enters their payment information during a checkout process Add to cart: A visitor adds a product to their shopping cart on your site Add to wishlist: A visitor adds items to a wishlist on your site Complete registration: A visitor completes a registration form on your site, such as a subscription form Contact: A visitor contacts your business; for example, via an email, telephone, SMS, chat or other type of contact on your site Customise product: A visitor selects a specific version of product, such as choosing a certain size Donate: A visitor donates funds to your organisation or cause Find location: A visitor finds your business location via the web Initiate checkout: The start of a checkout process; for example, clicking a “Buy now” button Lead: A visitor signs up for a trial or submits a form that identifies them as a lead Purchase: A visitor makes a purchase on your website; for example, landing on a ‘Thank You’ or confirmation page Schedule: Someone books an appointment to visit your business location Search: A visitor performed a search on your website Start trial: Someone signs up for a free trial of a product or service you offer Submit application: A visitor submits an application for a product, service or programme that you offer, such as a job application Subscribe: A visitor subscribes to a paid product or service that you offer View content: A visitor arrives on a specific page on your website, such as a product or landing page You can also set up custom events yourself, to get even more specific about the kind of data you require. Custom events use rules based on specific URLs, we’ll see this in action in the following section!

How to Create a Facebook Pixel

Now that you know what data you can track, it’s time to create your first pixel!

Step 1: Create Your Pixel

  1. Go to your Events Manager
  2. Click Connect data sources
    Connect data sources
  3. Select Web and click Get Started Web data source
  4. Select Facebook pixel and click Connect. Connection method
  5. Add your pixel name, and enter your website URL (optional: to check for easy setup options), then click Continue Add details

Step 2: Add the Facebook Pixel to Your Website

You now need to install some code on your web pages, so your pixel can start to gather information! There are a few different methods to do this, depending on your website platform. Install Facebook Pixel
  • If you use a platform like WordPress or Squarespace, you can install your pixel without having to edit your website code directly, via the Use a Partner button. See the complete list of partner integrations.
  • If a developer handles your website code, you can send them everything they need to set up your pixel via the Email Instructions link.
  • If neither of these options apply, you will need to insert the pixel code directly into your web pages yourself. To do this, follow the procedure below!
  1. Select Install Code Manually
  2. Select Copy code Connect Facebook Pixel
  3. Locate the header of your website; it may be a header template file in your CMS or web platform
  4. Paste the base code at the end of your header section, above the closing tag
  5. You’ll need to paste it into the ‹head› tag on every single page, or into the ‹head› tag of your template, if you’re using one.
  6. Click Continue
  7. Optional: Choose whether to use automatic advanced matching, to verify the customer information that you want to send and improve your reach; see about advanced matching to learn how this works Automatic advanced matching
  8. Click Continue

Step 3: Setup Pixel Events

Once your pixel base code has been added to your website, you’ll be able to set up events to start measuring user actions. This can be done by manually installing the code or by using the Facebook Event setup tool:
  1. Click Open Event Setup Tool Event Setup Tool
  2. Enter your website URL and click Open Website Set Up Event
At this point, your pixel code setup will be checked. If you receive a notification stating that a problem was found, your code was likely added incorrectly, see Best practices for Facebook pixel setup to troubleshoot any issues.

Step 4: Select the Events you want to Track

  1. Select which events you’d like to track using the toggle buttons. You can also set parameters for some events. For example, maybe you want to track purchases over a specific dollar value. Add events
  2. Optional: You can create completely custom events with custom conversions.
    1. Open Facebook Events Manager
    2. Select Create
    3. Choose Create Custom Conversion Create Custom conversion
For example, you may have a page on your site that redirects to a specific URL after a visitor signs up to your newsletter e.g. www.mysite.com/thanks-for-subscribing. You can track your subscribers (anyone who visits this page) by setting a rule as follows:
  1. Click the Select your own category link Select own category
  2. Select Complete registration, from the event dropdown menu
  3. Under the ‘Rules’ section, ensure URL and contains are both selected
  4. Enter ‘thanks-for-subscribing’ as the URL to track Standard event
  5. Click Next and type in a name for your Custom Conversion
  6. Click Create! You can continue the same process to track your visitors in an endless number of ways, so you can optimize for highly specific actions to target with your Facebook ads.

Step 5: Check your Facebook Pixel is Working

To ensure your Facebook pixel is tracking data flawlessly, you can test it with Facebook Pixel Helper.
  1. Add the Facebook Pixel Helper extension to your Google Chrome browser. Facebook Pixel Helper
    This tool is only available in Chrome.
  2. Now visit your website to test the installation. If the extension finds a pixel, the ‹/› extension icon will change to blue, and a popup will tell you the number of pixels it finds on the page. The popup also tells you whether or not your pixel is working correctly! If not, it will give the error information so you can fix the problem. Facebook Pixel Helper Result

Step 6: Add a Pixel Notice to Your Privacy Policy

To comply with Facebook’s legal terms, you need to make sure visitors to your website are aware that you’re collecting their data. You can do this by editing your website privacy policy. Be sure to clearly state that you are using a Facebook pixel and that their information may be collected through cookies. You should also let them know how to opt-out of Facebook Ad data collection.

How does Facebook Pixel Add Value to my Campaigns?

A Facebook Pixel will make advertising on Facebook much more effective for your business. You’ll learn more about your audience, see exactly who you’re advertising to, and you’ll also have a greater number of ways to gauge the effectiveness of your campaigns. Let’s see a few ways in which a Facebook Pixel can help improve your Facebook marketing results.

Retarget Your Site Visitors

You can use pixel data to show targeted ads to people who have already visited your site. You can choose to get specific, for example, you can target users with the exact product that they’ve already viewed on your website, or even previously added to a wishlist.

Optimize Your Ads for Conversions

Facebook tracking data can be used to optimize your Facebook ads for highly specific conversion events on your website. If you don’t use a pixel, the only conversion you can measure are link clicks. A Facebook pixel allows you to optimize for a whole range of conversions, such as purchases and new subscribers.

Create Ads to Target the Big Spenders

A Facebook pixel lets you see who buys from your website and how much they spend. With this knowledge, you can automatically show your ads to the people who are most likely to make purchases.

Create Lookalike Audiences

The data provided by a Facebook pixel can help you build a “lookalike audience” of people who have similar likes, interests, and demographics to your regular website visitors. This can help expand your reach and potential customer base.

Access Exclusive Facebook Ad Tools & Metrics

A Facebook pixel lets you use tools such as web conversion campaigns, custom audiences, and dynamic ads. You also need the pixel to track metrics such as cost per lead or cost per conversion.

Are You Ready to Convert More Customers?

By helping you to better understand the behavior of your website visitors, a Facebook pixel is an invaluable tool for refining your advertising strategy. To reach your full potential when advertising on Facebook, a pixel is the way to go! Want to learn more about Facebook? This article continues Web Hosting Canada’s ongoing series on Facebook marketing, strategy, and tactics. Follow us on Facebook to get updated when we post our next guide: How to Advertise on Facebook.

WHC is now certified as a Great Place To Work!

Web Hosting Canada is now a certified Great Place to Work! Following a thorough and independent analysis conducted by Great Place to Work® Institute Canada. This certification is based on direct feedback from employees, provided as part of an extensive and anonymous survey about the workplace experience. Emil Falcon, Web Hosting Canada's CEO commented, “We’ve invested a lot of energy to create a work environment that our employees feel great being a part of. We've set out to hire a competent, driven and cohesive team, which has definitely contributed to the overall success and ambience here at WHC. We’re proud and honoured to have received this certification and look forward to building on this success!”

What is it Like to Work at WHC?

At WHC, we’re committed to establishing an open, inclusive, and engaged workplace culture where great work is both recognized and rewarded. We prioritize the well-being of our employees and provide several perks for our team.
Work form anywhere

Work Remotely From Anywhere

Want to skip winter and work from a sunny beach? WHC employees can work from nearly anywhere! If they have reliable internet access, a private space, and can work during the Eastern Standard Time Zone, we’re thrilled to support them wherever they are.
Home work

Remote Work Allowance

For our remote employees, we offer up a financial allowance for ergonomics and equipment to ensure they have both a comfortable & secure space to work from. If they need an ergonomic chair or a new headset with a microphone, we’ll take care of it.
Mordern office

‘Modern Tech’ Office Design

For employees who want to work from a dedicated office space, our newly redesigned space in the vibrant heart of Montreal's tech sector embraces an open layout, to encourage creativity, collaboration, and fun, while also providing closed rooms for deep concentration. All staff can benefit from our quiet working pods, collaborative work lounges, free coffee, and even our fun room with foosball, ping pong, and video games.
Personal Spending Account

Well-being Spending Account

As part of our benefits package, we offer our employees a well-being personal spending account. This money can be put towards items such as health & wellness, child care, fitness and sports activities or equipment, alternative health therapies, green living or personal development, to name just a few.
Group chat

Weekly Coffee Chat Games

We realize that the solitary nature of remote work can feel lonesome at times. So, we’ve started a new initiative called ‘Coffee Talk’: a fun 30-minute video chat where Canadian employees participate in laugh-inducing interactive activities. Jeopardy anyone?
Referral fee

Talent Referral Bonus

We want to keep our fantastic culture of teamwork and collaboration alive and thriving! We encourage our employees to make referrals; we'll reward your referrals with a generous bonus.

Join the WHC team today!

Are you looking for a great place to work? We're growing and always searching for the perfect candidates to join the WHC family. Check out our Careers page to see which positions are currently available.

About Great Place to Work®

Great Place to Work® is the global authority on high-trust, high-performance workplace cultures. Through proprietary assessment tools, advisory services, and certification programs, Great Place to Work® recognizes the Best Workplaces™ across the world in a series of national lists including those published by Fortune magazine (USA) and The Globe & Mail (Canada). Great Place to Work® provides the benchmarks, framework, and expertise needed to create, sustain, and recognize outstanding workplace cultures.

Sherri Rabinovitch

WHC’s Blog

Articles by Sherri Rabinovitch

Sherri is WHC's Director of People & Culture and has always been passionate about connecting with people. Her objective is to make sure WHC employees are having the best experience possible while balancing the needs of the business.
WHC is a Great Place to Work®... once again!

We're thrilled to announce that WHC has been certified as a Great Place to Work… for the 4th year in a row!  And this doesn’t happen...

Read more
WHC has been certified a Great Place To Work… again!

We are thrilled to announce that Web Hosting Canada has been re-certified as a Great Place to Work, following a thorough and independent analysis conducted...

Read more
WHC is now certified as a Great Place To Work!

Web Hosting Canada is now a certified Great Place to Work! Following a thorough and independent analysis conducted by Great Place to Work® Institute Canada. This...

Read more
Web Hosting Canada manages fast and reliable online infrastructure with 24/7 support. Learn more about WHC

How to drive Facebook’s traffic to your website

Want to receive more organic traffic to your website from Facebook? The key to getting more visitors is to create content that drives engagement and entices people to click on links to learn more. In this article, we’ll be taking a look at several strategies that you can use to get your content seen - and ultimately drive traffic to your website. Facebook is the largest social media network in the world, with more than 2.7 billion active users every month - or nearly a third of the global population! It is undoubtedly one of the most powerful platforms to promote your brand. As a result, it’s also highly competitive! So to stand out, it’s essential to understand how Facebook promotes content on its network.

What is the Facebook Algorithm?

The Facebook algorithm is a set of calculations that Facebook uses to decide which posts users see, and in what order, based on their preferences. It is no secret that Facebook's number one priority is to keep users engaged across their ecosystem. The algorithm itself is continuously evolving, and a key ranking factor is how likely a user will be to interact with the content itself. The content displayed is based on various “signals” such as likes, clicks, comments, and shares. So, if you often click on videos of dogs catching frisbees, for example, similar videos will appear in your feed. As a side note, part of Facebook’s algorithm also prefers native content, for example, videos uploaded directly to the platform itself, rather than embedded YouTube videos. Though not impossible, it makes it even trickier to drive traffic to sites and platforms outside Facebook, as they look to keep users on their own platform for longer periods of time. This means you must be even more vigilant in creating engaging content that is far more likely to rank higher, be seen more often and translate to clicks (organic traffic) to your website.

What Types of Content Can Drive Traffic?

Bear in mind that vanity metrics like ‘likes’ and ‘comments’ can sometimes feel really good to receive, but they only get you so far. Creating engaging pieces of content that actually translates to conversions is what really counts. There is an endless amount of content that you can use to engage your audience and drive traffic back to your website, but here are some great examples you can use to get the ball rolling:
  • Blog posts
  • Help articles
  • Case studies
  • White papers
  • Tutorials
  • New products and services
  • Giveaways
  • Announcements
  • Newsletter signups
If your social posts are enticing enough, your audience will click through to your website in order to learn more or to see more content.

Strategies for Posting Content on Facebook

Now that you understand the importance of creating engaging content, the next step is to look at some useful strategies that will deliver rock-solid results!

Use Visually Appealing Images and Videos

It is essential to have strong visual content, to ensure you stand out from the crowd. By using more attractive images and video thumbnails, you’ll potentially increase customer engagement and the likelihood that you’ll show up prominently in their news feeds. According to research completed by Buffer (and based on the data of 777,367,063 Facebook posts) videos get at least 59% more engagement than any other post type. Additionally, 81% of the top 500 posts of 2018 were videos, while images accounted for 18%.
Facebook post engagement
It’s important to bear in mind that publishing poor-quality images or videos could have the undesirable effect of making your brand look unprofessional. So to keep the content looking good, you should follow the Facebook minimum size recommendations:
  • Facebook profile picture: 180 x 180
  • Facebook cover image: 820 x 462
  • Facebook link image: 1200 x 630
  • Facebook image post: 1200 x 630
  • Facebook event image: 1920 x 1080
  • Facebook video: 1280 x 720
  • Maximum video length: 240 minutes
  • Facebook ad: 1200 x 628
  • Facebook video ad: 1280 x 720
  • Facebook story ad: 1080 x 1920
  • Facebook group cover image: 1640 x 922
  • Facebook messenger image ad: 1200 x 628

Alternate Your Post Types

The next traffic-boosting strategy is to alternate your post types. Facebook offers a wide range of options, including:
  • Photo/video (including live video)
  • Location check-in
  • Milestones
  • Feelings
  • Notes
  • Support for nonprofits
  • Polls
  • Q&A sessions
Try out as many as you can to see what your audience responds to. By mixing up your post formats, you’ll keep your content fresh and may even keep your audience more engaged. By experimenting with different options and examining the results over time, you can gain an understanding of which types are the most relevant to your audience, drive the most engagement, and bring you the most traffic!

Find Your Optimal Time to Post

As satisfying as it is to have bright and shiny content, it's wasted if posted at the wrong time. If you share your blogging masterpiece when the bulk of your audience is asleep, it'll be lost in the feed by the time they wake up. Research is abundant regarding the optimal time to post. Many brands see the most reach and engagement when posting Wednesday to Friday from 12 PM to 4 PM. However, every audience is unique, every industry is unique, so general advice can only get you so far. 
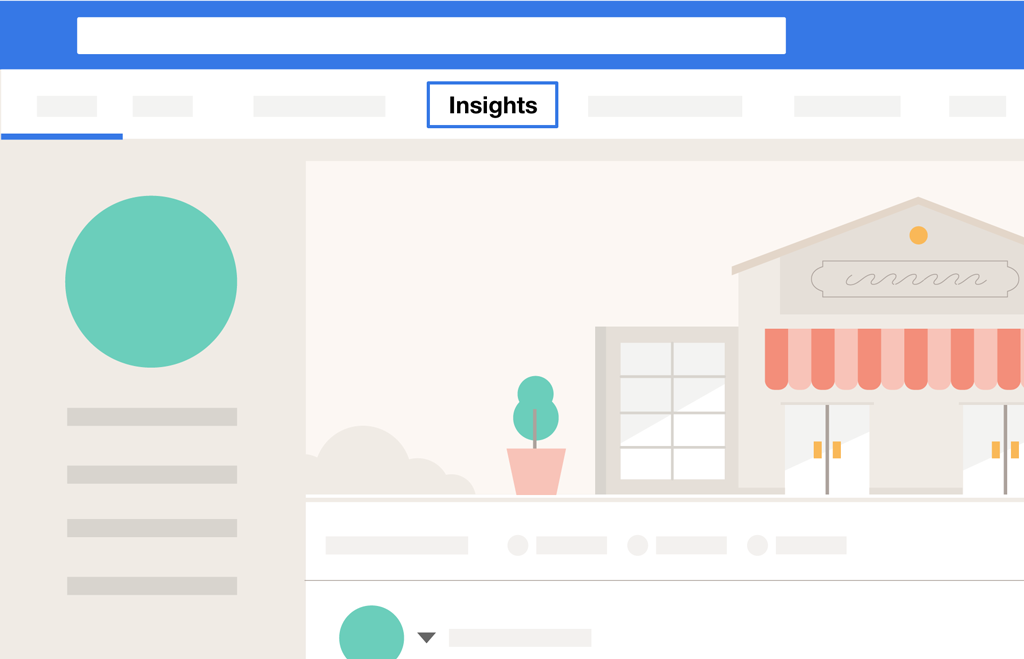
To get the timing right, use your Facebook analytics to see when your audience is online. You can check peak times of day on your Page Insights. 
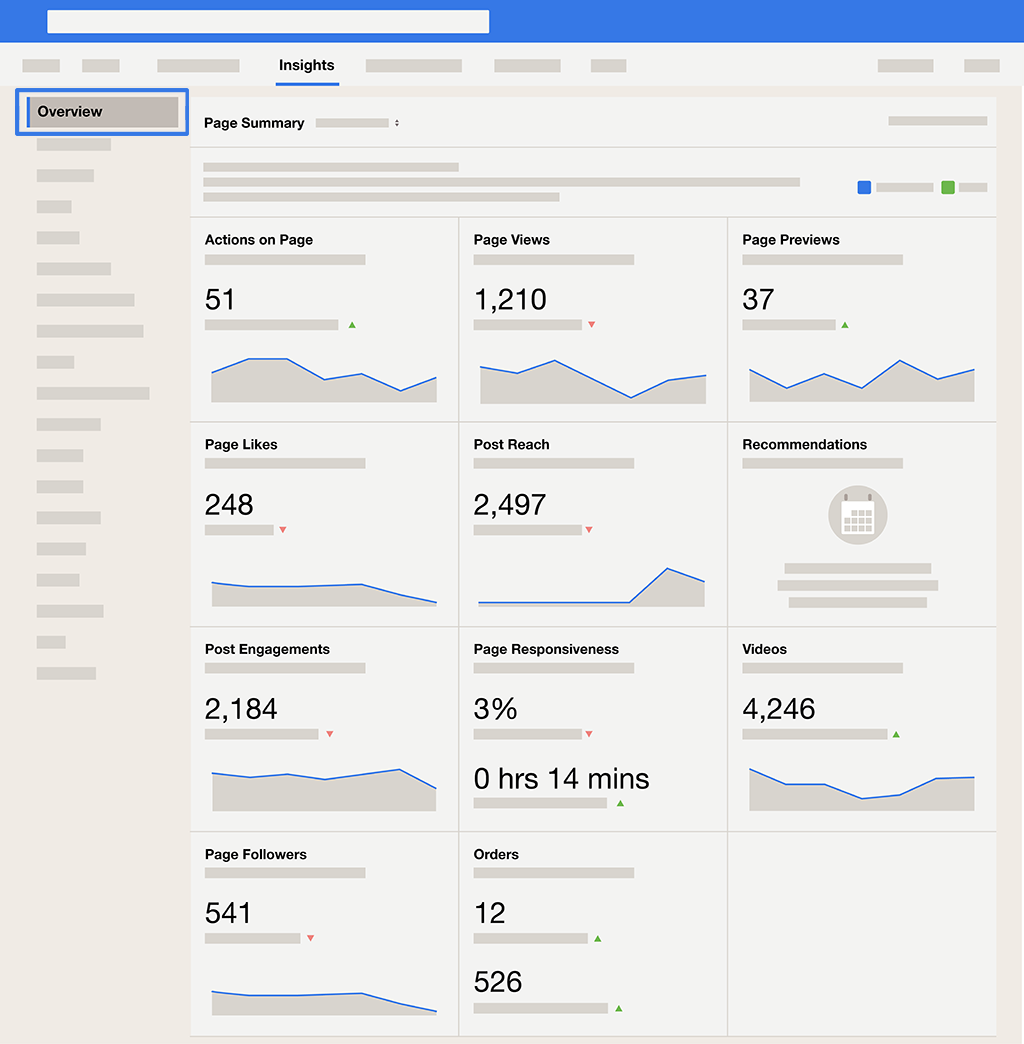
To access Page Insights, go to your Facebook Page and click Insights in the top menu:
Page InsightsPage Insights. Source: Facebook
The Overview tab shows your Page Summary. This summary gives you a neat overview of all the metrics on your Page:
Page Insights OverviewPage Insights Overview. Source: Facebook
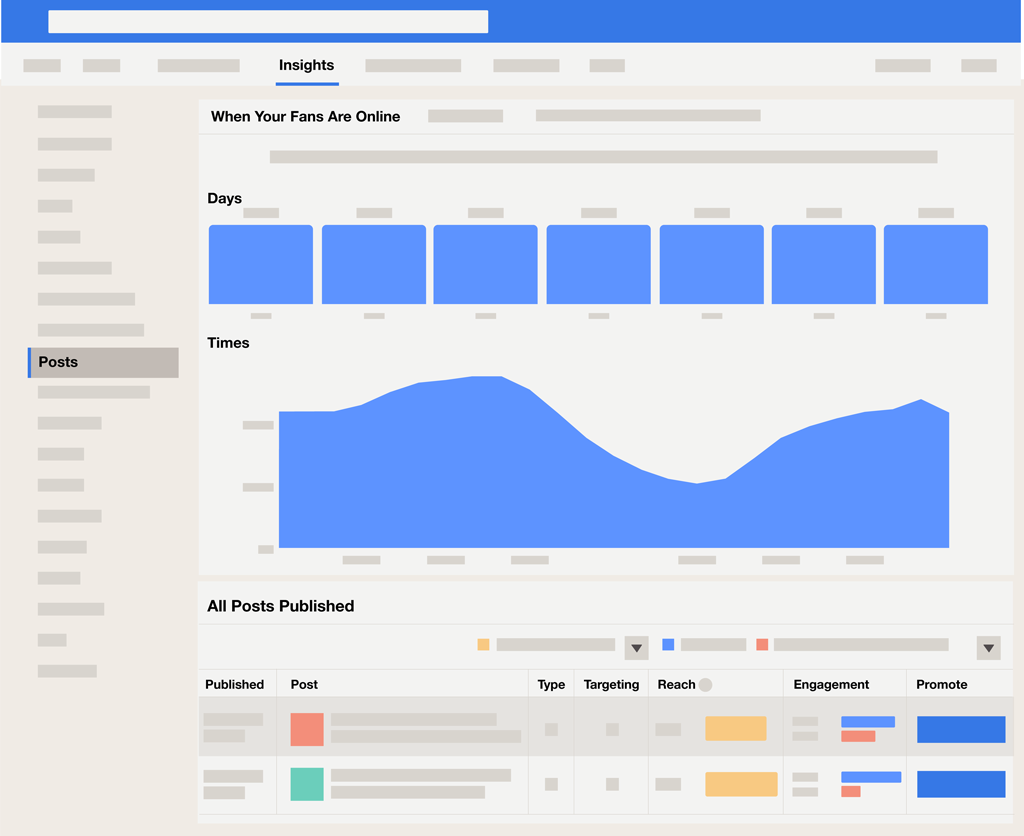
You can see peak days and times for your audience in the Posts section:
Posts InsightsPost Insights. Source: Facebook
Here you can examine your specific audience statistics for each hour of the day. And you can then determine the most optimal time to post. If you post your content just before peak traffic hours (e.g. 2:45 PM, if your peak is 3 PM), your content will arrive just as your audience is opening Facebook. This maximizes the chances that your content will appear at the top of their feed - so your engagement potential will be much higher. Of course, the best advice is to use the data as a tool, experiment regularly, and build your content schedule based on a combination of your research.

Find Your Ideal Post Frequency

Once you know the optimal time to post to Facebook, the next step is to determine how often to post. Your ideal post frequency will depend on your audience - there’s no magic number that works for every brand. Remember the goal is to keep your followers engaged! If you are posting multiple times per day with high engagement each time, your reach will stay optimal. However, if you observe a drop in interaction after your first post, you may want to consider reducing your frequency and focus more on quality. The key is to conduct your own research, experiment with how often you post and track the results in your analytics. For example, try posting 5 times one week, 10 times the next, and then 15+ posts the following week. Observe the average engagement at the end of each week, so you can compare each period of time to determine the ideal post frequency for your audience.

Refresh Successful Content

Don’t be afraid to refresh old content! If you have posts that have been wildly successful in the past, they are very likely to work again. Producing quality videos and blog articles is time-consuming, and there’s nothing wrong with bringing new life to successful older content. You may even find that reused content gets even more traction the second time around! Perhaps the headline needed a tweak, the content more refinement, or maybe it was originally posted at the wrong time of day. Reusing a post is a great way to improve the reach of content that already works. The prize is gaining further insight that will strengthen your overall social media strategy. Be aware that there are a few things to watch out for when refreshing your posts. Content with a connection to a specific time or event will have likely lost its relevance. Similarly, any mentions of research or statistics will need to be updated. So generally, steer clear of the following:
  • News and brand updates
  • Opinions
  • Statistical reviews
  • Trends
Potentially re-shareable content should be an authoritative resource, for example:
  • How-to guides
  • Tutorials
  • General tips
  • FAQ’s
To maximize your results, remember to focus on your most engaging content, especially the pieces that drive traffic to your website and increase conversions (leads, sales etc.).

How to Use Your Facebook Group to Drive Traffic

Facebook groups can be a fantastic way to build interest in your brand. When you run your own group, you create a community of like-minded people who are interested in your business and are very likely to grow into a steady stream of traffic for your website. As a bonus, Facebook’s algorithm favors content from groups with high engagement. So if your group is active and thriving, your content will gain further reach, which in turn brings you more traffic! Talk about a ‘Win’!

How to Create Your Group

If you don’t already have a Facebook group for your brand, it’s a pretty straightforward process. Follow the steps below to get started: Create a Facebook group
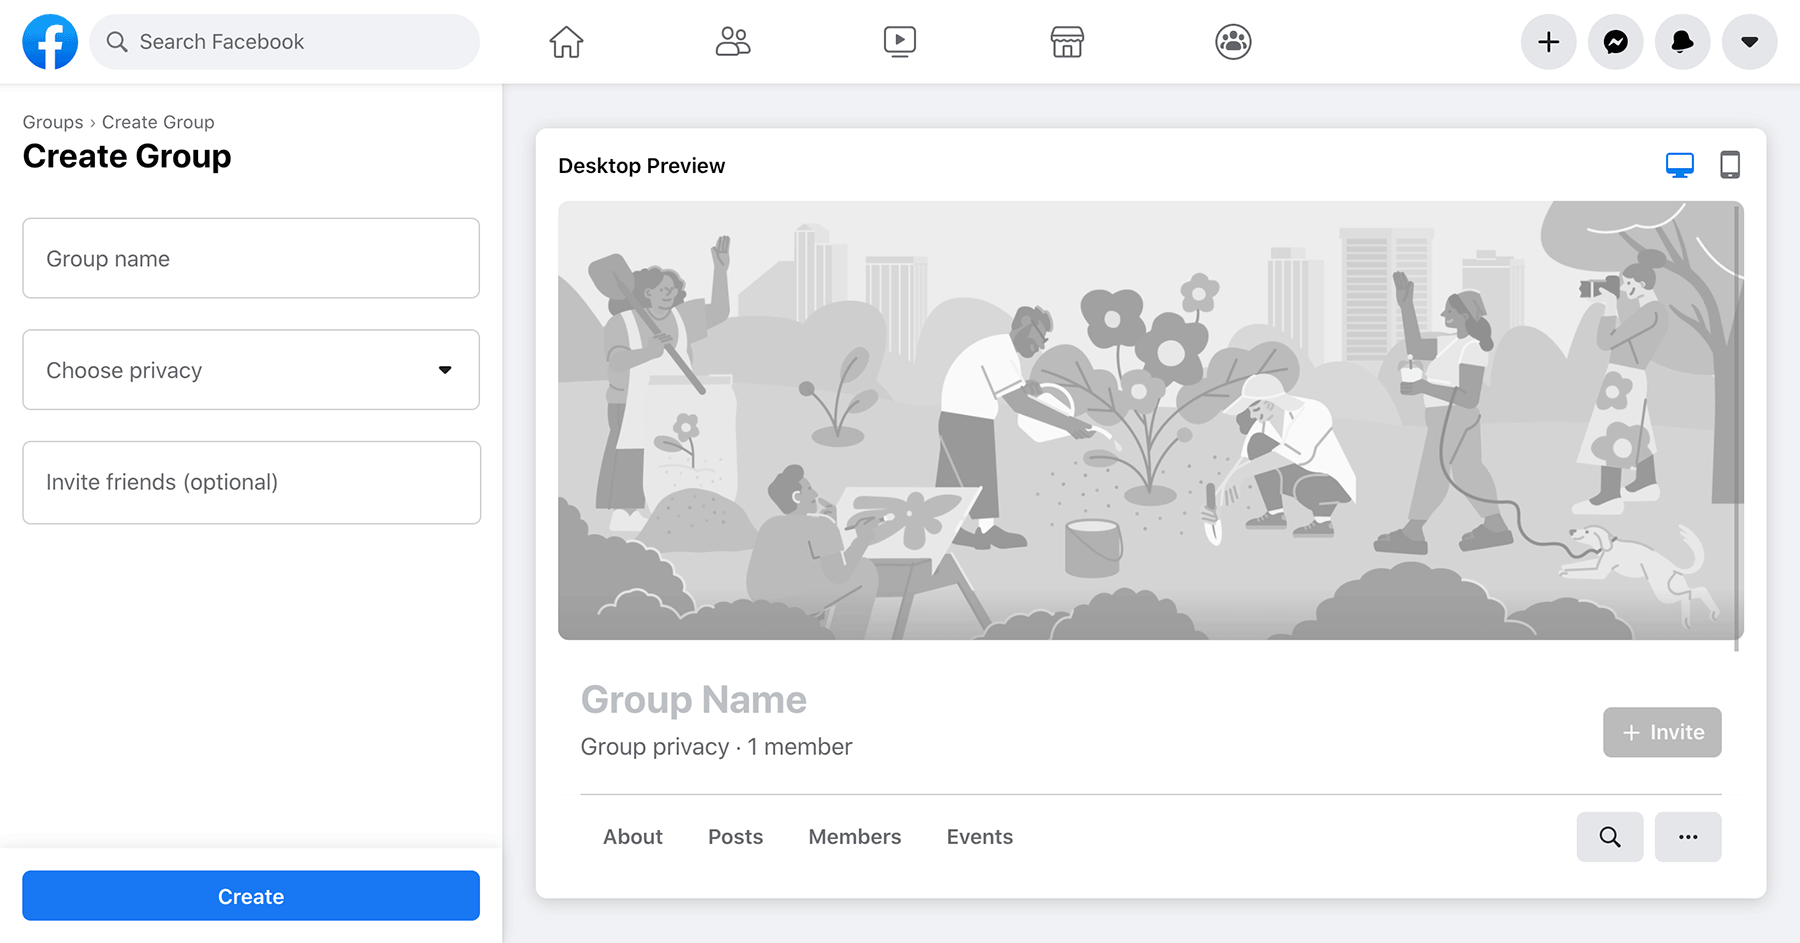
  1. Open up Facebook, click the ‘+’ menu on the top right of the screen and select Group.
  2. Optional: Upload a cover photo — if you have one ready, go for it!
  3. Enter your group name (preferably your business or brand name).
  4. Pick your privacy preference (public for anyone to access, or private to create a “members-only” community).
  5. Optional: Invite people to your group.
  6. Click Create.
It is now time to build your following & drive more traffic to your site!

Tips for Building an Engaged Facebook Group

The ultimate goal of building a Facebook group is to create a captive, qualified and engaged audience that is interested in your brand and will drive traffic to your website in order to convert to sales. In order to do this, you must build a strong Facebook group by leveraging the tools available to you, and creating meaningful content for your target market.

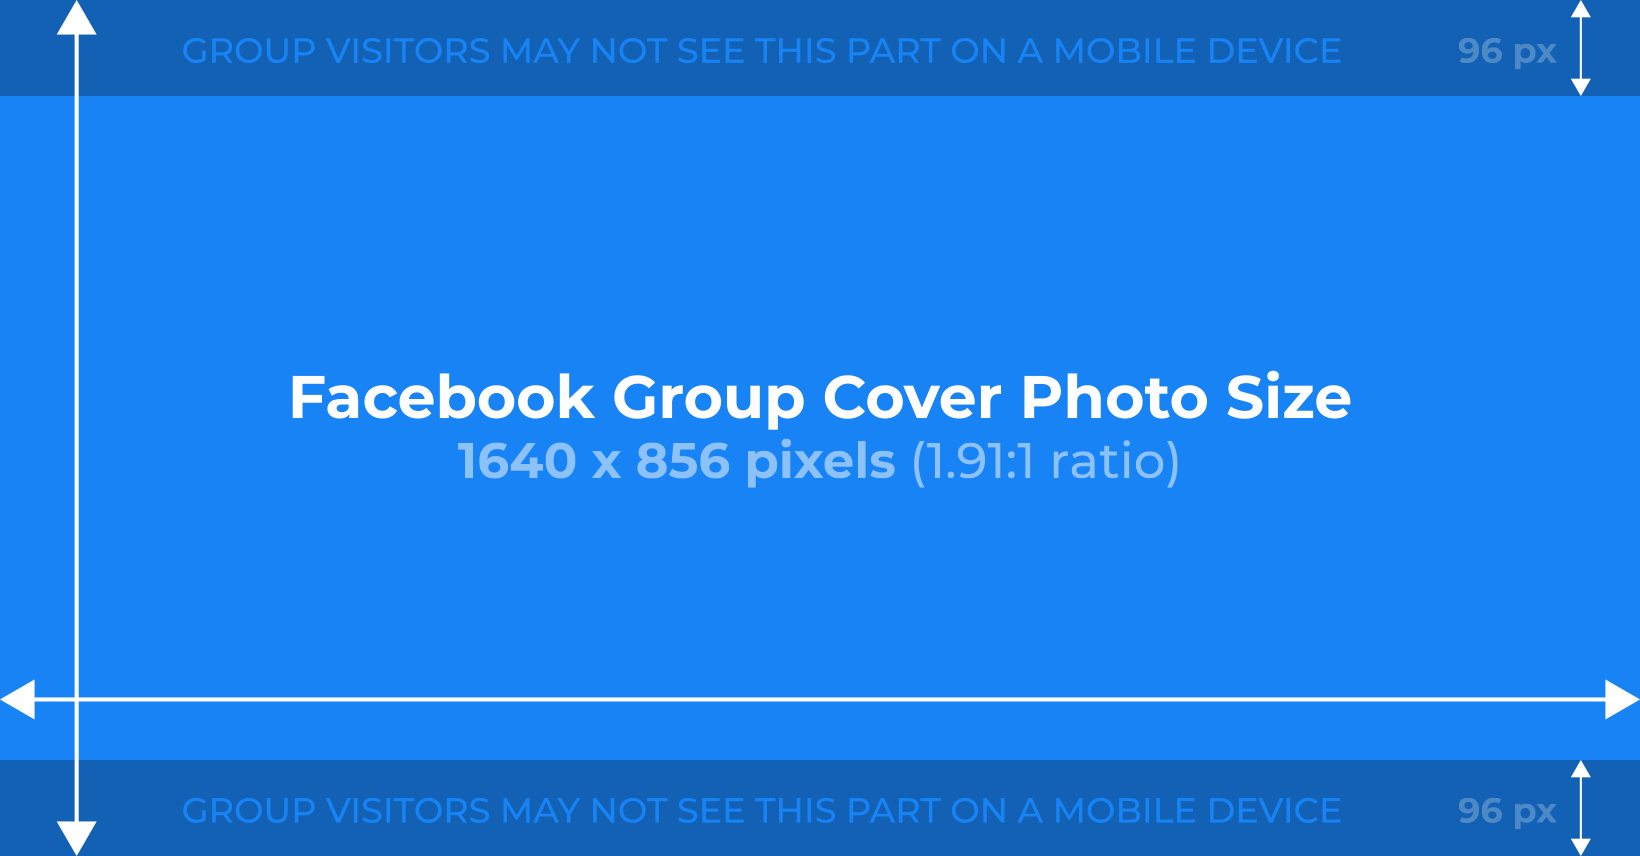
Upload the Perfect Cover Image

A professionally designed cover image will make your brand stand out and be memorable for your audience. It’s also important to make sure your image is appropriately sized. The ideal size for a Facebook group cover photo is 1640 pixels wide by 856 pixels tall (or an aspect ratio of 1.91:1). This size is recommended for the best results across all devices, minimizing the auto-cropping of your cover photo. Facebook group cover photo size

Write a Compelling Description

A well-written description tells people about your brand, sets the tone for your community, and lets your audience know how you can help them. It is also the perfect time to direct people to your website, or sign up for your newsletter!

Make a Pinned Post

In Facebook groups, you can “pin” a post to the top of your feed, so it’s the first thing your new members will see. A pinned post is an opportunity to welcome everyone to your group and add a call to action which links members back to your website. e.g. “See more information”.

Post Content That Benefits Your Audience

As the group owner, it is your job to create an atmosphere and build a sense of community. You can do this by posting content that benefits your audience in various ways. Some examples include:
  • Free tutorials and how-to guides for your product offerings
  • Exclusive tips that relate to a blog post
  • Personal messages & behind-the-scenes insights
  • Motivational posts to establish yourself as a thought leader in your industry
By giving your audience continuous value, they are far more likely to engage with your brand and convert into traffic for your website.

Find Group Members

How do you get people to join your group? An easy first step is to make an announcement to your email list. Send out an email announcing the group and invite everyone to join in. Always link to your group in your newsletters, too. You can also add a prominent link on your website to promote your group and advertise it on all your social media channels. A call to action at the end of each blog post is also a great idea - be sure to tell your readers how they benefit from joining.

Give Your Members Something Special

By offering exclusive content, you give your members a reason to consistently check-in & engage. Some examples are Q&As, AMAs, and invites to webinars.

Don’t Neglect The Housekeeping

For your group to flourish, it needs regular maintenance. Check-in frequently to answer questions, add members, remove spam, and moderate any flagged content. It can take some work, but it’s worth it when you have a loyal audience all in one place! And you can always share the load by assigning moderator duties to a willing colleague.

How to Leverage Facebook Groups That You Don't Own

There is an endless number of Facebook groups for every topic imaginable. By performing a search in the group section, by using relevant keywords, you'll find numerous quality groups you can join. By becoming a member of leading industry-related groups, you’ll have the opportunity to post and promote your brand. Be sure to read the group rules when you join, before you start promoting your business.

Find Out The Group “Promo Days”

Most groups have appointed specific “promo days” when you are allowed to promote and link to your website. If you promote yourself on non-promo days, you risk getting banned - don’t do it! Participating in promo days is a highly effective strategy to get people to your website. Especially when promoting to large groups with tons of reach. The owner will usually specify which days they allow for promotions, in the group description, or a pinned post. On the non-promo days, you can still gain traffic by participating in conversations and giving your expert advice by responding to member questions.

Are You Ready to Get More Traffic?

It is time to make Facebook work for your brand! To grow your following, figure out what content is the most engaging and become active in your community. Keep trying new ideas, tinkering with your strategy, and publishing great content! Over time, you’ll build up a valuable resource that consistently sends engaged traffic to your website. Want to learn more about Facebook? This article continues Web Hosting Canada’s ongoing series on Facebook marketing, strategy and tactics. Follow us on Facebook to get updated when we post our next guide: How (and when) to Boost a Post on Facebook.

Three reasons your website visitors will trust a .CA domain

Did you know, even a tiny top-level domain (TLD) name can contain information about your website that would be useful to visitors? A domain extension can indicate your geographical location, purpose or even a little bit of information about your organization. A top-level domain (to the right of the dot) can be as short as two letters but can still promote feelings of trust in your website visitors. For example, if you choose .CA, here are a few reasons why website visitors will automatically have confidence in your website:

1. The Canadian connection

When you register a .CA domain, you have to indicate your connection to Canada. It’s CIRA’s role as the .CA domain registry to ensure that .CA domains are registered by people and businesses that meet these specific requirements. That is, .CA is for Canadians, not Californians, Catalonians, or chartered accountants from Casablanca. Why does this matter? Because it ensures that when customers see a .CA domain they know a website is built for (and likely run by) Canadians. Canadians tend to trust other Canadians more, particularly when shopping or doing business online. Our Canadian Presence Requirements also make it harder to register a .CA domain name for nefarious purposes.

2. Low on the Badness Index

Speaking of nefarious purposes, there is such a thing as a Badness Index for domains. The SpamHaus Project, an international nonprofit organization that tracks spam and related cyber threats such as phishing, malware and botnets, has a list of the 10 Most Abused Top Level Domains. Their Badness Index takes into account things such as domains that are used to send spam, domains that host malware and other sketchy activities. Here are a few Badness Index scores (high score=bad):
Top-level domain Badness Index, October 2020
.email 2.89
.biz 1.35
.net 0.86
.com 0.46
.info 0.47
.CA 0.01
The numbers speak for themselves, but let’s put it another way: when people visit a .CA website, there’s a really low chance it’s going to be a sketchy site compared to other top-level domains.

3. Ecommerce, the Canadian way

Even the most polite Canadian can get mildly perturbed when they are shopping online and find out that a business isn’t listing prices in Canadian dollars, or isn’t shipping to Canada. Having a .CA domain name indicates to potential customers that your organization does business in Canada. Knowing their business caters specifically to Canadians increases a potential customer’s confidence, and implicitly answers some of their questions before they even visit your website (e.g. Do they ship to Canada? Do they sell to Canadians using CAD currency?). In fact, recent survey data tells us that seven in ten Canadians prefer to support Canadian businesses whenever possible. A .CA domain name is the quickest and easiest way to show your business is Canadian, online. So there you have it. If you want to attract Canadians to your website, you can either put pictures of poutine, appealing Canadiana stock photos, or simply go with a trusted .CA domain.
1

How can we help?

How can we help?

Our experts are available 24/7
Chat Now

Search the Help Center

Questions?

Our friendly customer service team is available right now.

Start Live Chat
LIVE CHAT »