Web Hosting Canada

Archives

What is an SSL Certificate and Why Do I Need One?

Ever wondered what the little padlock in your browser next to the website’s domain name is? That’s an indicator that the website is encrypted by an SSL certificate. If you don’t see one (or if the lock is open/red), it may mean that you’re visiting the site over an unsecure connection that anyone else can be “listening in” on.

What is an SSL Certificate?

SSL certificates make your website more secure by:
  1. Certifying, through a certification authority that’s trusted by your browser, that the connection is secure
  2. Encrypting data sent between your website and its visitors
They also help increase trust (and sales!) by displaying the security lock in your browser’s address bar. When data is transmitted securely on the web, it uses an HTTPS connection. HTTPS stands for Hypertext Transfer Protocol Secure. It’s the secure version of HTTP, the default means through which computers communicate over the Internet.
Geeky fact: HTTPS connections generally use port 443 on the Internet, whereas unsecure HTTP connections generally use port 80.

Why are SSL and HTTPS important?

SSL and HTTPS are crucial to prevent specific types of virtual threats, called man-in-the-middle attacks. These are situations where a hacker would be connected to your wifi network (for example, in a public café) and intercepting unencrypted data being transmitted between your website and your device. In more sophisticated attacks, they could even pretend to be your website while unsuspecting clients submit new credit card orders. Some of this data, such as passwords and credit card information, is very sensitive and should never be transmitted over unsecure connections. Once the connection is encrypted, even if the hacker were to intercept the data, they would be unable to decipher and understand it.
Avoiding Man-in-the-Middle Attack
Having an HTTPS connection is also a known ranking factor for search engines such as Google, as well as a trust factor for people visiting your website. Even folks who don’t know what an SSL certificate is can recognize a broken red padlock as a bad thing, and some browsers now block you from accessing sites through HTTP unless you explicitly accept the risk of accessing an unsecure website. In other words, if you don’t have an active SSL certificate on your website, you’ll get less traffic and people will spend less time visiting your pages. Since the whole point of a website is to attract and assist visitors, not having an HTTPS connection is a big problem.

How can I get an SSL Certificate?

Premium SSL certificates can often be ordered from your hosting provider or specialized security providers, while basic SSL certificates often come bundled with web hosting plans. If your hosting account includes basic SSL security, it will likely use automated SSL provisioning technology powered by either Let’s Encrypt or, as is the case for WHC, cPanel’s AutoSSL , to automatically prepare a certificate for you to use.
Web Hosting Canada’s Web Hosting, Reseller Hosting, Cloud Servers and Dedicated Servers already include free basic SSL (called AutoSSL) through cPanel.

What kind of SSL do I need?

Most websites with basic needs and no online shopping will function well with the free AutoSSL certificates, bundled with most hosting plans. Larger websites, eCommerce stores, and anyone taking payments or collecting sensitive information may want to upgrade to a higher tier of encryption. In most cases, Web Hosting Canada recommends investing in a premium SSL certificate once your website starts earning over $10,000 per year, or if it is processing sensitive information. The following premium SSL certificates are available directly with WHC:

Essential SSL

Essential SSL protects one domain (including both the version with and without “www”) and provides a $10,000 warranty, in case anything goes wrong at the Certificate Authority’s end. While providing a similar level of security and trust as AutoSSL, they back their security claim with a warranty, allow for manual certificate verification that may be necessary for private websites or applications, and include a static website seal, which improves trust. Essential SSL generally costs less than $50/year and is recommended for websites that process less than $50,000 in online sales each year.

Wildcard SSL

Wildcard SSL can protect one domain with unlimited subdomains and, just like Essential SSL, provides a $10,000 warranty. Wildcard SSL uses the same type of encryptions as Essential SSL, but that encryption can be extended to as many subdomains as necessary. That means you could secure yourdomain.com as well as app.yourdomain.com and store.yourdomain.com all with one certificate. Similarly as with Essential SSL certificates, Wildcard SSLs include a website security seal, which helps improve trust. Wildcard SSL certificates are recommended for websites using different subdomains on the same primary domain and generally cost less than $160/year.

Extended Validation (EV) SSL

EV SSL protects one domain and provides a dynamic site seal and a $1,000,000 warranty. Its dynamic seal displays your company’s name and address, as well as the certificate’s period of validity, which provides the greatest level of trust to your clients. EV SSL certificates are recommended if your website or application manages important confidential information or processes over $50,000 of online sales per year. EV SSL certificates generally cost less than $400/year, but due to the extended nature of the verification, expect the activation process to require you to send proof of business ownership and operation, and take over 10 days to complete.

How do I install and maintain an SSL certificate?

If you’re using a reseller account or a web hosting “Pro” account or greater, your basic SSL certificates will be automatically installed and renewed using cPanel’s AutoSSL. Your only responsibility in this case is to make sure that the HTTPS connection is being “forced” throughout the entire site. For a walkthrough of how to do this, consult how to force the use of SSL in WHC’s Help Center. If your website is hosted with WHC when you purchase a premium SSL certificate, WHC staff will install it for you. If your website is hosted elsewhere you can still purchase SSL through WHC; however you or your hosting provider will need to take care of its installation. EV SSL certificates require confirmation of you and/or your business’ identity. If this applies to you, you will receive an email requesting the information shortly after your purchase. Remember that premium certificates need to be renewed yearly; otherwise your security will expire and your visitors will see security warnings on your website.

How do I know if my certificate is working?

The first thing to look for is a little padlock in the corner of your browser’s address bar. If the lock is intact, closed and/or green, it means the site you’re visiting is safely encrypted. If it’s broken, unlocked, or red, it means there isn’t a certificate or its use isn’t being forced. You can use a service such as SSL Labs to test your certificate more rigorously. SSL Labs will scan your website and give you a rating that approximates how effective your certificate is.

SSL Troubleshooting

Got SSL issues? The following articles in WHC’s Help Center might help! The following online tools can also help you diagnose and resolve SSL issues:
  • WhyNoPadLock: Helps you find out why your SSL certificate padlock doesn’t show as secure on your website
  • SSL Server Test: Performs a deep analysis of your SSL web server
  • Certificate Decoder: Decodes your encoded SSL certificate and verifies that it contains the correct information
Still need help choosing the best SSL certificate for your needs? Simply ask your question below or get in touch with WHC’s friendly customer service team!

Spencer Callaghan

WHC’s Blog

Articles by Spencer Callaghan

Spencer Callaghan manages product communications for CIRA, the .CA domain registry. He is a writer and former journalist, with experience in technology, non-profit, and agency environments. His areas of expertise include content marketing, social media, branding, and public relations.
Three reasons your website visitors will trust a .CA domain

Did you know, even a tiny top-level domain (TLD) name can contain information about your website that would be useful to visitors? A domain extension can...

Read more
Web Hosting Canada manages fast and reliable online infrastructure with 24/7 support. Learn more about WHC

Tim Robards

WHC’s Blog

Articles by Tim Robards

Tim is WHC's Technical Writer & Integrator. When he's not writing user guides or filming tutorials, you’ll likely find him building websites or enjoying the great outdoors.
Say Hello to WordPress 6.8

WordPress 6.8 “Cecil” has officially arrived—named in tribute to boundary-pushing jazz pianist Cecil Taylor. Like its namesake, this...

Read more
PHP 8.2 and 8.3 are now available

PHP 8.2 & 8.3 are now available on WHC's Web Hosting, Reseller Hosting, and Managed WordPress plans. For Cloud and Dedicated plans, these new versions...

Read more
Now Available: AlmaLinux 9, Ubuntu 22 and CloudLinux 9

We're thrilled to announce that AlmaLinux 9 & Ubuntu 22 are now seamlessly integrated with our Cloud and Dedicated server offerings, and CloudLinux...

Read more
Discover what's new in WordPress 6.6

WordPress 6.6 has landed! It brings a suite of updates designed to enrich your site's functionality and aesthetic appeal. At WHC, we're committed to helping...

Read more
WordPress 6.3
WordPress 6.3 "Lionel" is here

The latest version of WordPress has arrived and it’s the second major release of 2023! WordPress 6.3 “Lionel” is named after the celebrated...

Read more
Introducing cPanel 110

The latest version of cPanel, version 110, is now available at WHC! cPanel, renowned as the foremost hosting control panel on the web, is at your disposal...

Read more
cPanel 108 has arrived!

If you are using any of WHC's web solutions, you are probably aware that cPanel is the tool used to manage your services behind the scenes. It is the gold...

Read more
Monitor your web performance with PHP X-Ray

Are you looking for a way to speed up your website and boost its performance?  Introducing PHP X-ray! A new performance monitoring tool you can use...

Read more
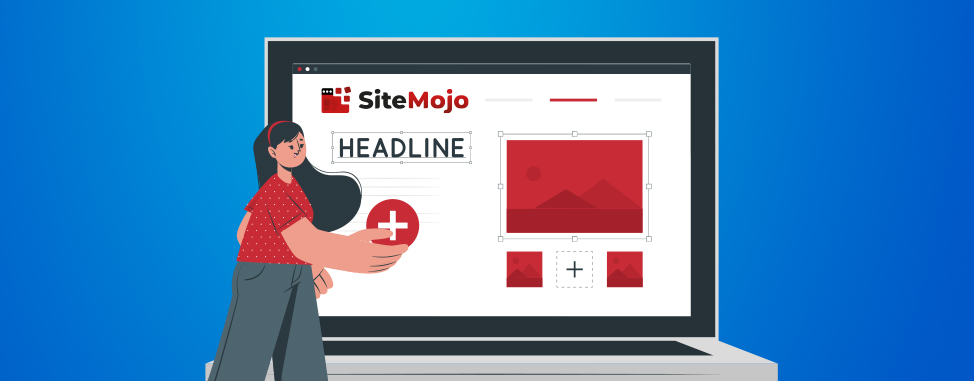
Introducing SiteMojo

Are you looking for a way to quickly create a beautiful, fully functional website without hiring an expensive website designer?  Introducing…...

Read more
WordPress 6.2
WordPress 6.2 "Dolphy" is here

The latest version of WordPress is here! WordPress 6.2 “Dolphy” is named after the influential jazz multi-instrumentalist — Eric Allan...

Read more
Web Hosting Canada manages fast and reliable online infrastructure with 24/7 support. Learn more about WHC

CentOS 6 End Of Life (EOL): Migrate Now!

What’s happening?

As of November 30, 2020, CentOS 6, the popular Linux distribution, will reach its end of life. This means important functionality and security updates will no longer be applied to this version. As such, users of CentOS 6 are strongly encouraged to migrate to a new, fresh installation of CentOS 7 in order to continue benefiting from a secure, updated operating system. If you use a cloud or dedicated server that runs CentOS 6, the Web Hosting Canada team will be here to guide and assist you every step of the way to ensure a smooth and secure migration. Read on for all the details!

What is CentOS?

CentOS is the operating system that powers many of the servers that host your websites and emails. It’s a leading open-source Linux distribution derived from the Red Hat® Enterprise Linux® (RHEL) operating system. At Web Hosting Canada, CentOS is the default operating system for our Cloud Servers and the basic operating system for our Dedicated Servers.

When is the CentOS End of Life (EOL)?

The end of life date varies based on the version of CentOS you are using.
  • CentOS 6 EOL is on November 30th, 2020
  • CentOS 7 EOL is on June 30th, 2024
  • CentOS 8 EOL is on May 31st, 2029
As of October 2020, Web Hosting Canada and cPanel do not yet support CentOS 8.

What happens once CentOS reaches EOL?

Once your version of CentOS reaches end of life (EOL), it will stop receiving important security updates. This usually means that all your server’s contents, including websites, emails and other applications may become vulnerable to hacking attempts. Certain other applications, like the cPanel control panel, may also stop updating on your system. While it doesn’t necessarily mean that your server will quickly get hacked, the longer you use a software that’s no longer receiving updates, the higher the chances of your server being compromised. As such, using software that’s EOL, especially an operating system, is strongly discouraged. This is particularly true for sensitive systems that host important websites and databases.

Which services are affected?

Dedicated and Cloud Servers running CentOS 6 are affected by this CentOS 6 EOL event. If you are a WHC client using Web Hosting, Reseller Hosting, Managed WordPress Hosting, or Windows Cloud Hosting, your services will not be affected.

How can I tell which OS version I am using?

If you use a cloud or dedicated server, you can identify which operating system you are running on your server by logging in via SSH and running the command:
cat /etc/centos-release
If you use a cloud or dedicated server with cPanel, you can also log in to WHM as the root user; the OS version will normally be displayed at the top right of your screen.

What’s new in CentOS 7 and 8?

While the technical differences between the various versions are outside the scope of this particular article, we invite you to consult the CentOS Product Specifications for a detailed comparison table.

How can I switch to a newer version of CentOS?

Switching from CentOS 6 to CentOS 7 generally involves migrating from your old server to a new server that is running the newer operating system. When performing these upgrades with WHC, this can either be done in 1 of 2 ways:
  • By activating a new server, then migrating your existing data and updating your domain’s DNS or the server’s IP address. This process can be assisted by WHC for cPanel Dedicated or Cloud Servers.
  • By formatting and reinstalling your existing server. You’ll need a full external backup first, which we can use to restore on your server once it’s been reinstalled with the newer operating system. This process can be handled by WHC for cPanel Dedicated Servers.
Note that depending on the size of your storage, a full-format in-place server restore may cause several hours of service downtime. Depending on your current service and setup, WHC’s support team can recommend a preferred course of action to minimize risk and downtime for you and your clients, and to schedule this downtime during off-peak hours.
Upgrading your CentOS operating system from one major version to another without a migration is unfortunately not supported by WHC in a production environment. While theoretically feasible through third-party scripts, in-place upgrades are extremely error-prone and as such are strongly discouraged.

How can I avoid having to migrate my server?

Dedicated servers running CentOS 6 can upgrade to CloudLinux 6, which offers extended support until 2024. CloudLinux is a drop-in replacement for CentOS, meaning it can be installed on your existing dedicated server without needing to migrate your data. It also includes many additional features and benefits, such as added performance, security and resource isolation. Cloud servers unfortunately do not support CloudLinux 6. CloudLinux 6 with extended support is available at a cost of $19/month, per server. Servers already using CloudLinux 6 as of December 2020 will see a slight increase in the cost of the license, from $14 to $19/month. However, CloudLinux 7 licensing rates will remain at $14/month. Unless there are specific features you are looking to leverage from CentOS 7, opting for CloudLinux 6 can potentially be a smart move as it would allow you to keep your existing setup until 2024, at which time CentOS 7 will be EOL and you may be able to switch to CentOS 8 directly.
WHC Cloud Servers running CentOS 6 cannot be upgraded to CloudLinux 6 and as such will be migrated to CentOS 7 by our team.

Are there risks with a migration?

Just like with any other system migration, there are inherent risks when migrating data between two systems. While cPanel inter-system migrations are generally straightforward, special considerations may need to be made if you use customized scripts or applications. Some examples of issues post-migration include changes in PHP versions or configuration, missing libraries or binaries, changes in DNS or IP configuration, issues with SSL certificate transfers, and more. Your friendly WHC team can help mitigate these risks and ensure that the migration process is fluid and that any issues that arise are quickly resolved.

What should I do to prepare?

  • Have recent backups We strongly recommend you have recent off-server backups of all your data in order to be able to easily recover your data in case of problems. WHC proposes a premium backup solution, powered by JetBackup, to help secure your data during this type of migration.
  • Clean up your accounts Review your cPanel accounts and perform a general cleanup to reduce the total size of the accounts that will need to be migrated or restored. This can include email accounts too.
  • Use a recent version of PHP As of October 2020, WHC recommends you use PHP 7.3 or later.
  • Inform your IT department or developers Their interventions may be required post-migration to help troubleshoot unexpected errors.

What should I do next?

If you have a Cloud Server running CentOS 6 or CloudLinux 6 with WHC, we’ll reach out and schedule the migration for you, before December 2020. If you have a Dedicated Server running CentOS 6 with WHC, consider upgrading to CloudLinux 6 Extended Support edition, or get in touch with our support team to discuss your migration options. If you are operating a cPanel server running CentOS 6 that isn’t hosted with WHC, please reach out to our technical sales team to help you get migrated onto a secure, up-to-date CentOS 7 or CloudLinux 7 Cloud or Dedicated Server in Canada. Whatever you choose, we’re here to help!

How to Create and Optimize Your Facebook Business Page

Creating a Facebook business page is a simple step you can take towards promoting your business and driving interested and qualified traffic to your website. Making a custom Facebook page is just another powerful (and free) tool for your digital toolbox.

If you’re wondering if Facebook marketing will work for your business, consider that in 2020 Facebook has over 2 billion active monthly users. Odds are that some of your target audience is active on this platform. Keep in mind that certain types of businesses - adult-themed or cannabis/CBD-related ventures, for example - will not be able to advertise on Facebook, but most brands are at least permitted to create a page and employ organic marketing.

What is a Facebook Business Page?

It’s a dynamic page on Facebook dedicated to promoting your business or brand. You can feature information such as your name, address, phone number, email, and other relevant info. You can also collect likes and followers, receive reviews, and create or schedule posts for your audience to enjoy.

What’s the Difference Between My Facebook Profile and a Business Page?

In many ways, your Facebook page and profile are similar. You can go live on both, make posts and status updates, gain followers, and so on. But there are also some key differences. On a Facebook page you can:
  • Schedule posts in advance
  • Assign roles and privileges to employees/team members
  • Connect to your Instagram account
  • See post analytics such as views and engagement
  • Boost posts and create ads (when connected to an ad account)
  • Integrate chatbots and other marketing tools
With all of these extra features on pages, you might be wondering why people still choose to promote their businesses using their personal page. There are actually several advantages to using a Facebook profile as well:
  • Facebook posts on your profile tend to get better engagement than organic posts on business pages
  • You can connect with people by adding them as friends, which makes them a follower by default
  • Many people are less suspicious of and more likely to reach out to personal profiles than business pages
While there is definitely some value in marketing directly from your personal profile on occasion, not having a business page would be a mistake in most cases. Facebook is an authoritative social media platform, so having your website URL and contact information displayed there are important social signals for SEO. And because of the billions of users on Facebook, a dedicated page for your business can be a deciding factor in building trust (especially if you receive good public feedback!).

How to Create a Facebook Business Page

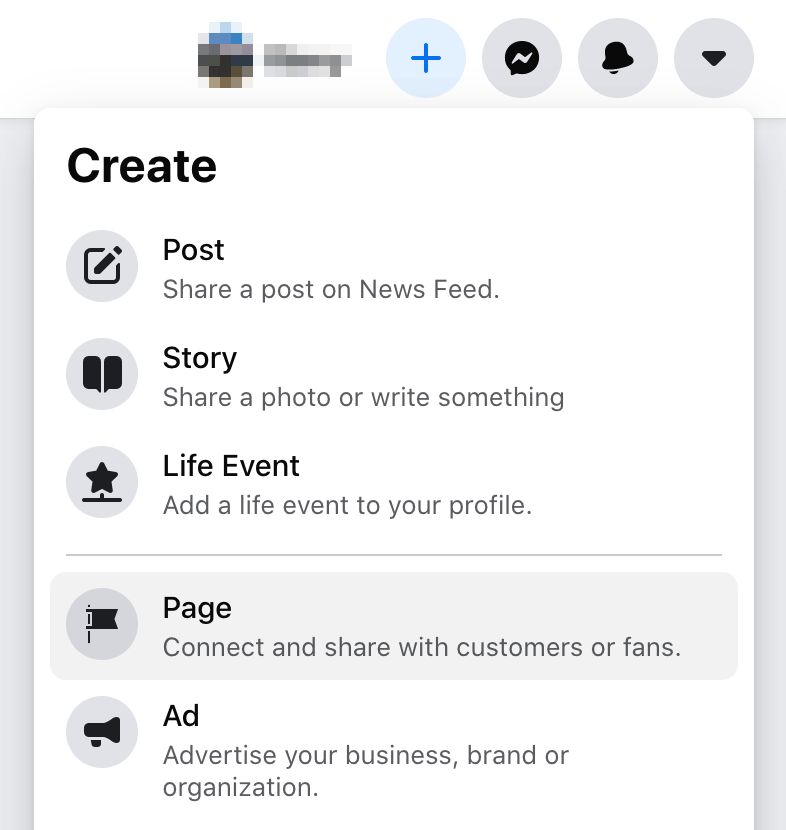
There are a couple of ways you can get started, but the easiest is just to sign in to your personal account and click on the plus icon in the upper right corner.
You cannot create a Facebook page without a personal account. The profile that creates a page becomes its first administrator by default, so it’s not possible to have a page without a profile first.
Facebook Page creation button
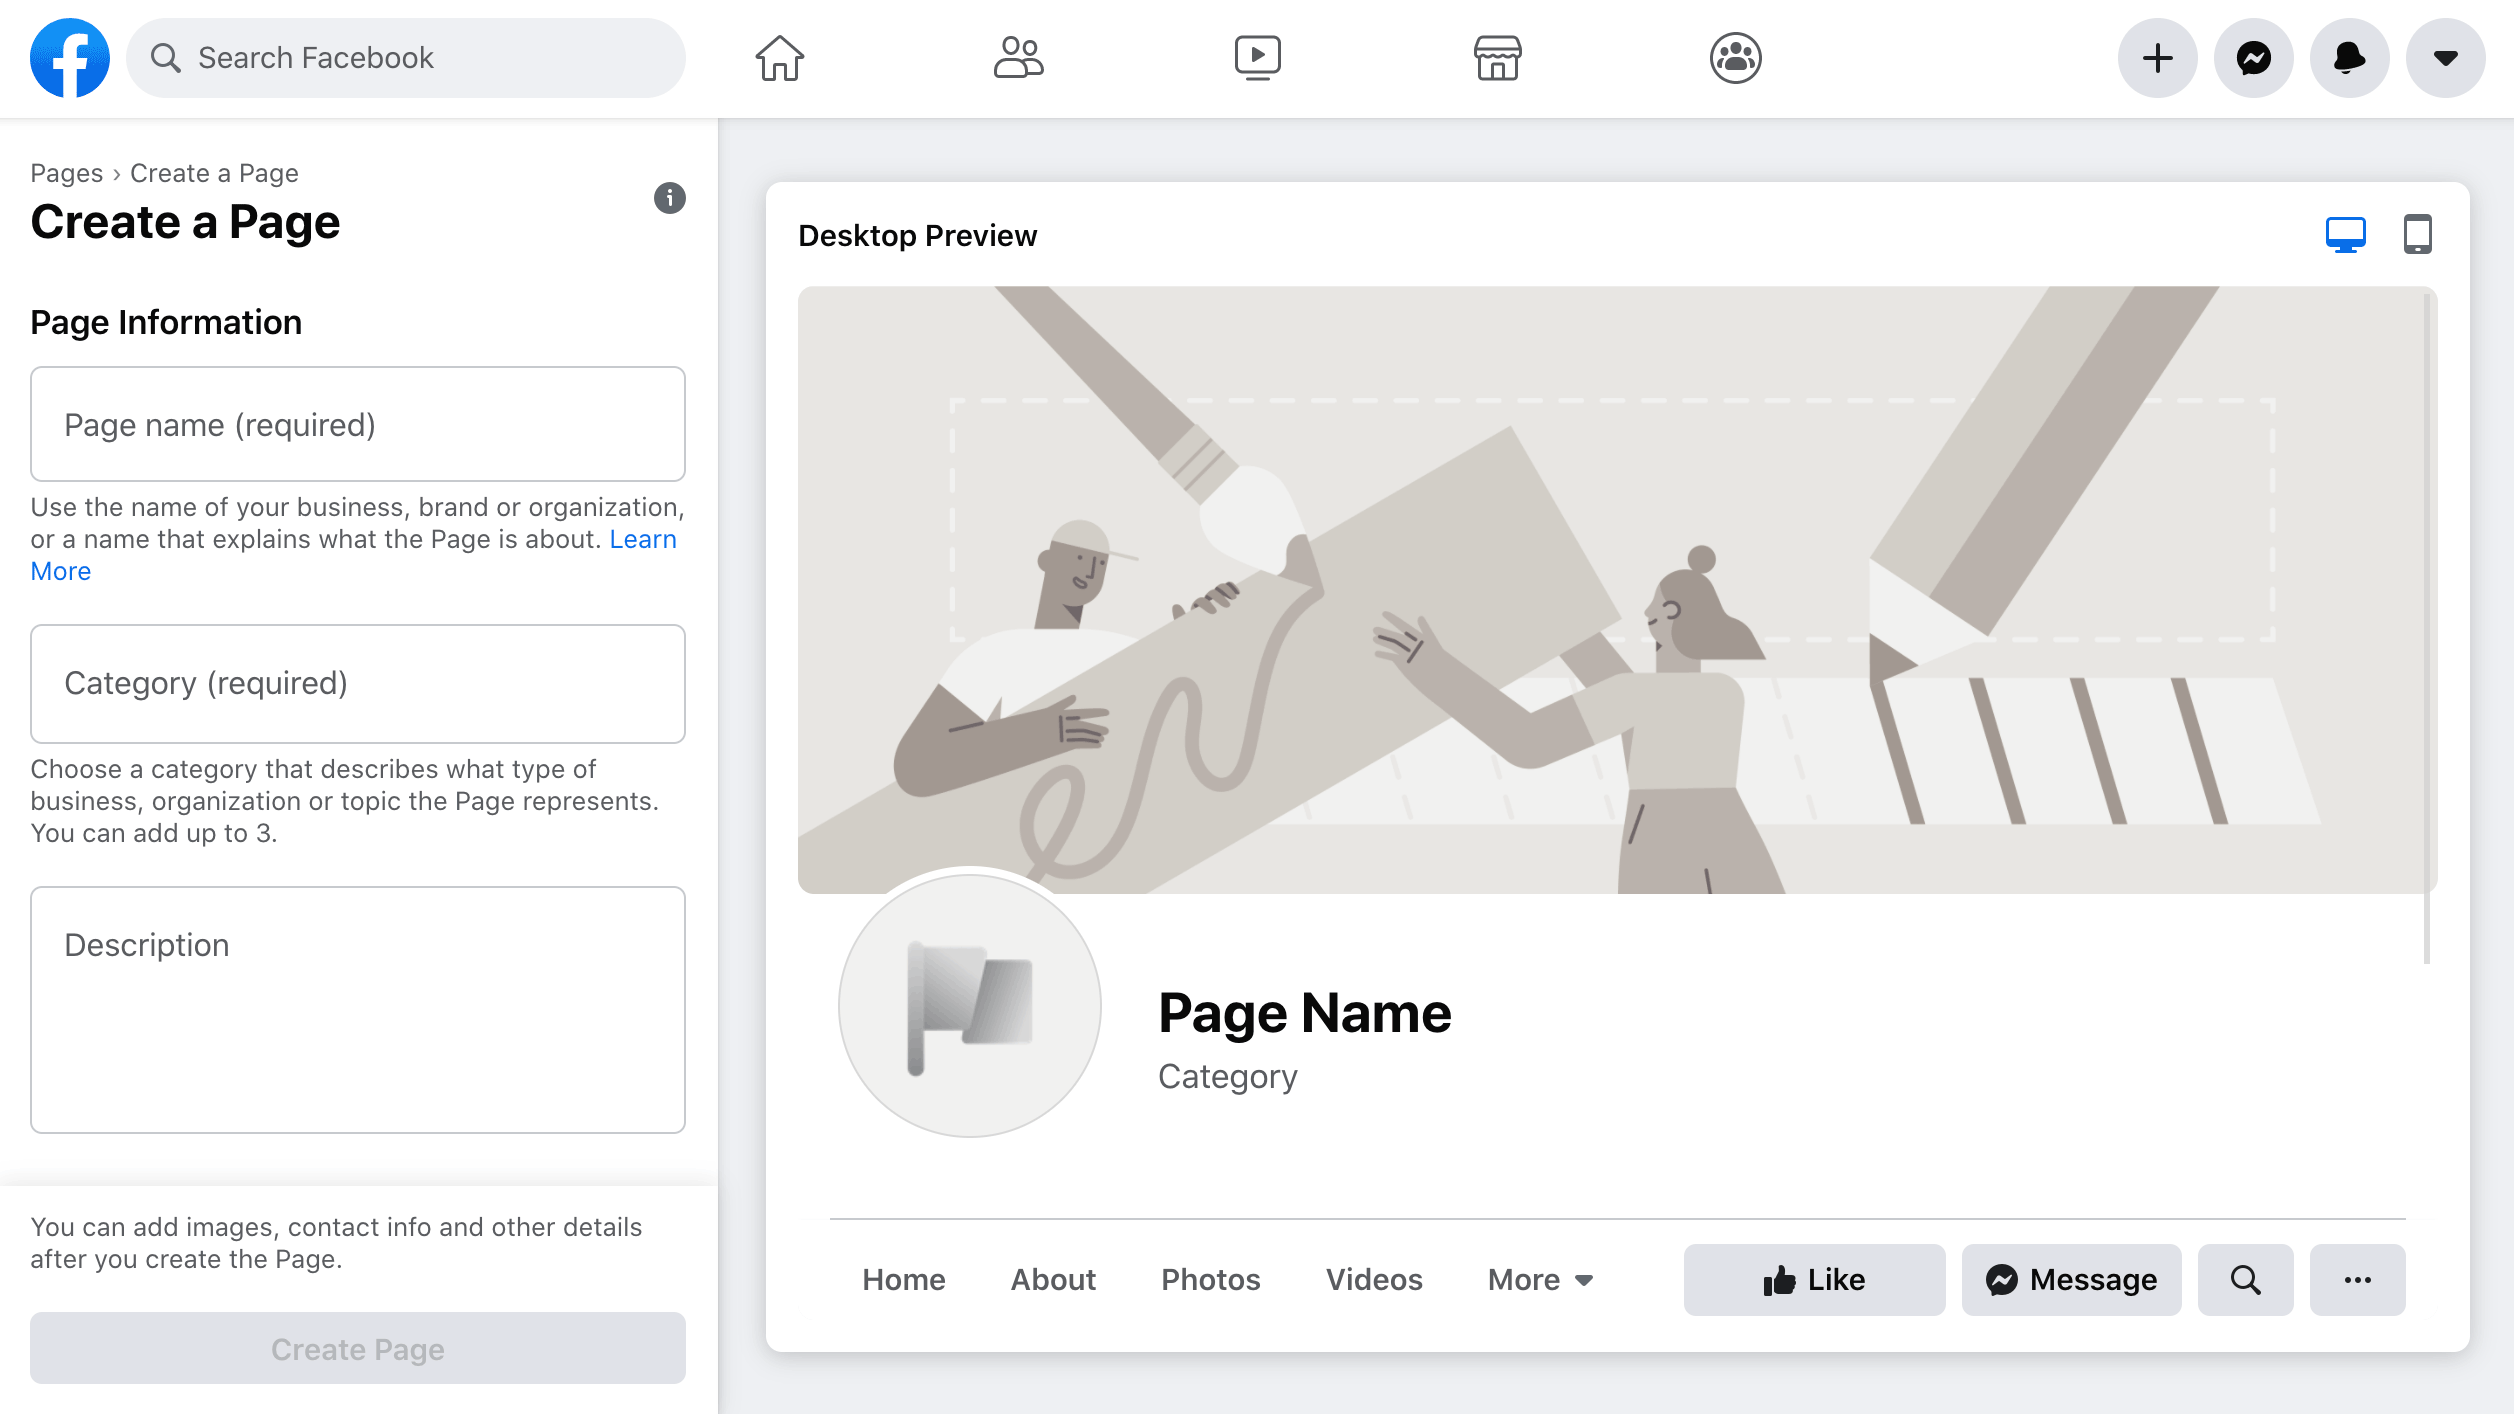
Click on Page to go to the Facebook page creation screen. It changes fairly frequently, but as of the latest update it looks like this:
Facebook Page informations
Fill out all available fields and then click the Create Page button.
  • For Page name it’s best to put the exact name of your business or as close to it as you can get. If you don’t have a business, use your usual screen name or something that provides an idea of what you do.
  • For Category start typing a word associated with your business activity and select the best option you can find. For example, there is no “web hosting provider” category, so WHC uses “Web Designer” and “Internet Technology Company” instead.
  • Description may be left blank, but filling it out with an accurate and keyword-rich descriptor is important, so you may as well do it right away. You can always alter it later!

How to Optimize Your Facebook Page

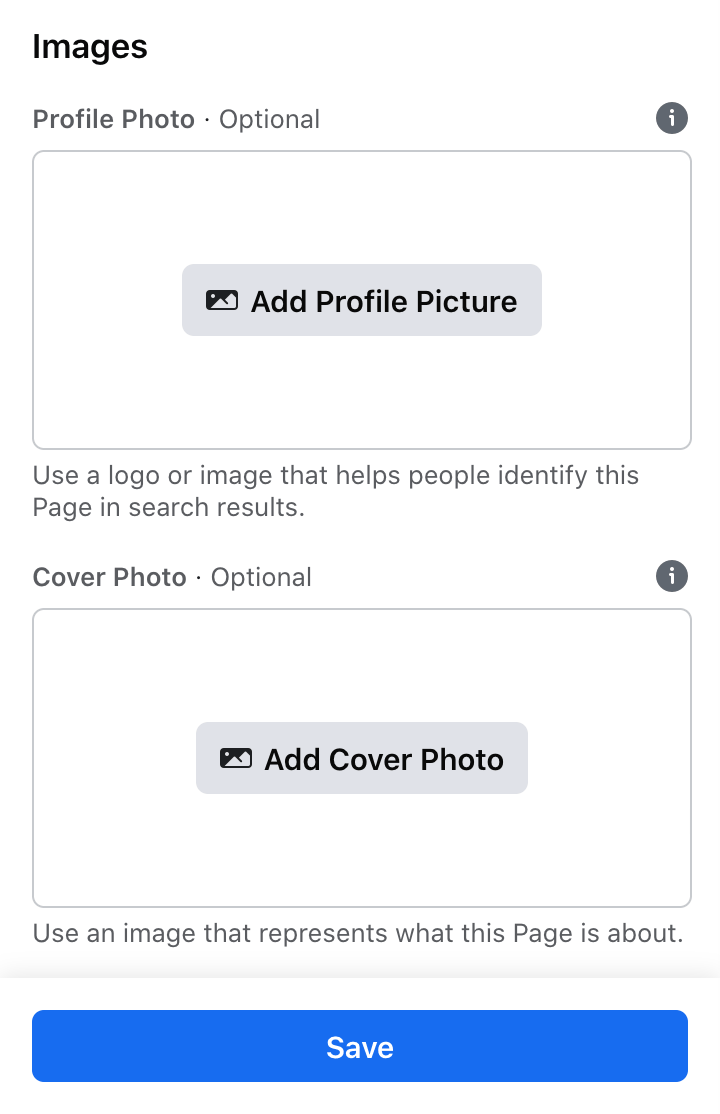
After clicking Create Page you should see a brief “Success” message, at which point two new fields will appear in the left column: Profile Photo and Cover Photo.
Facebook Pages images
Follow these steps in order to create an optimized Facebook business page:
  1. Click on Add Profile Picture and upload a profile photo. Most businesses will use their company logo here, whereas individuals may use a headshot or other personal photo/image. Your profile image should be at least 170x170 pixels; however, for better results, you should upload a larger image.
  2. Click on Add Cover Photo and upload an image to appear at the top of your page. It should be at least 820x312 pixels. For better results, use a larger image and ensure you keep the same aspect ratio. e.g. 1640x624. Common practices are to use an image that invites the user to either click on it or click on the CTA button we will soon add below.
  3. Click on Save.
At this point, your Facebook page will be generated, and you’ll be given a first look at your new creation. There will be a number of obvious buttons you can click on throughout the page that will encourage you to add more information. Ideally, you should fill out every field as completely as possible - this is good for SEO but also for increasing visitor trust and understanding.

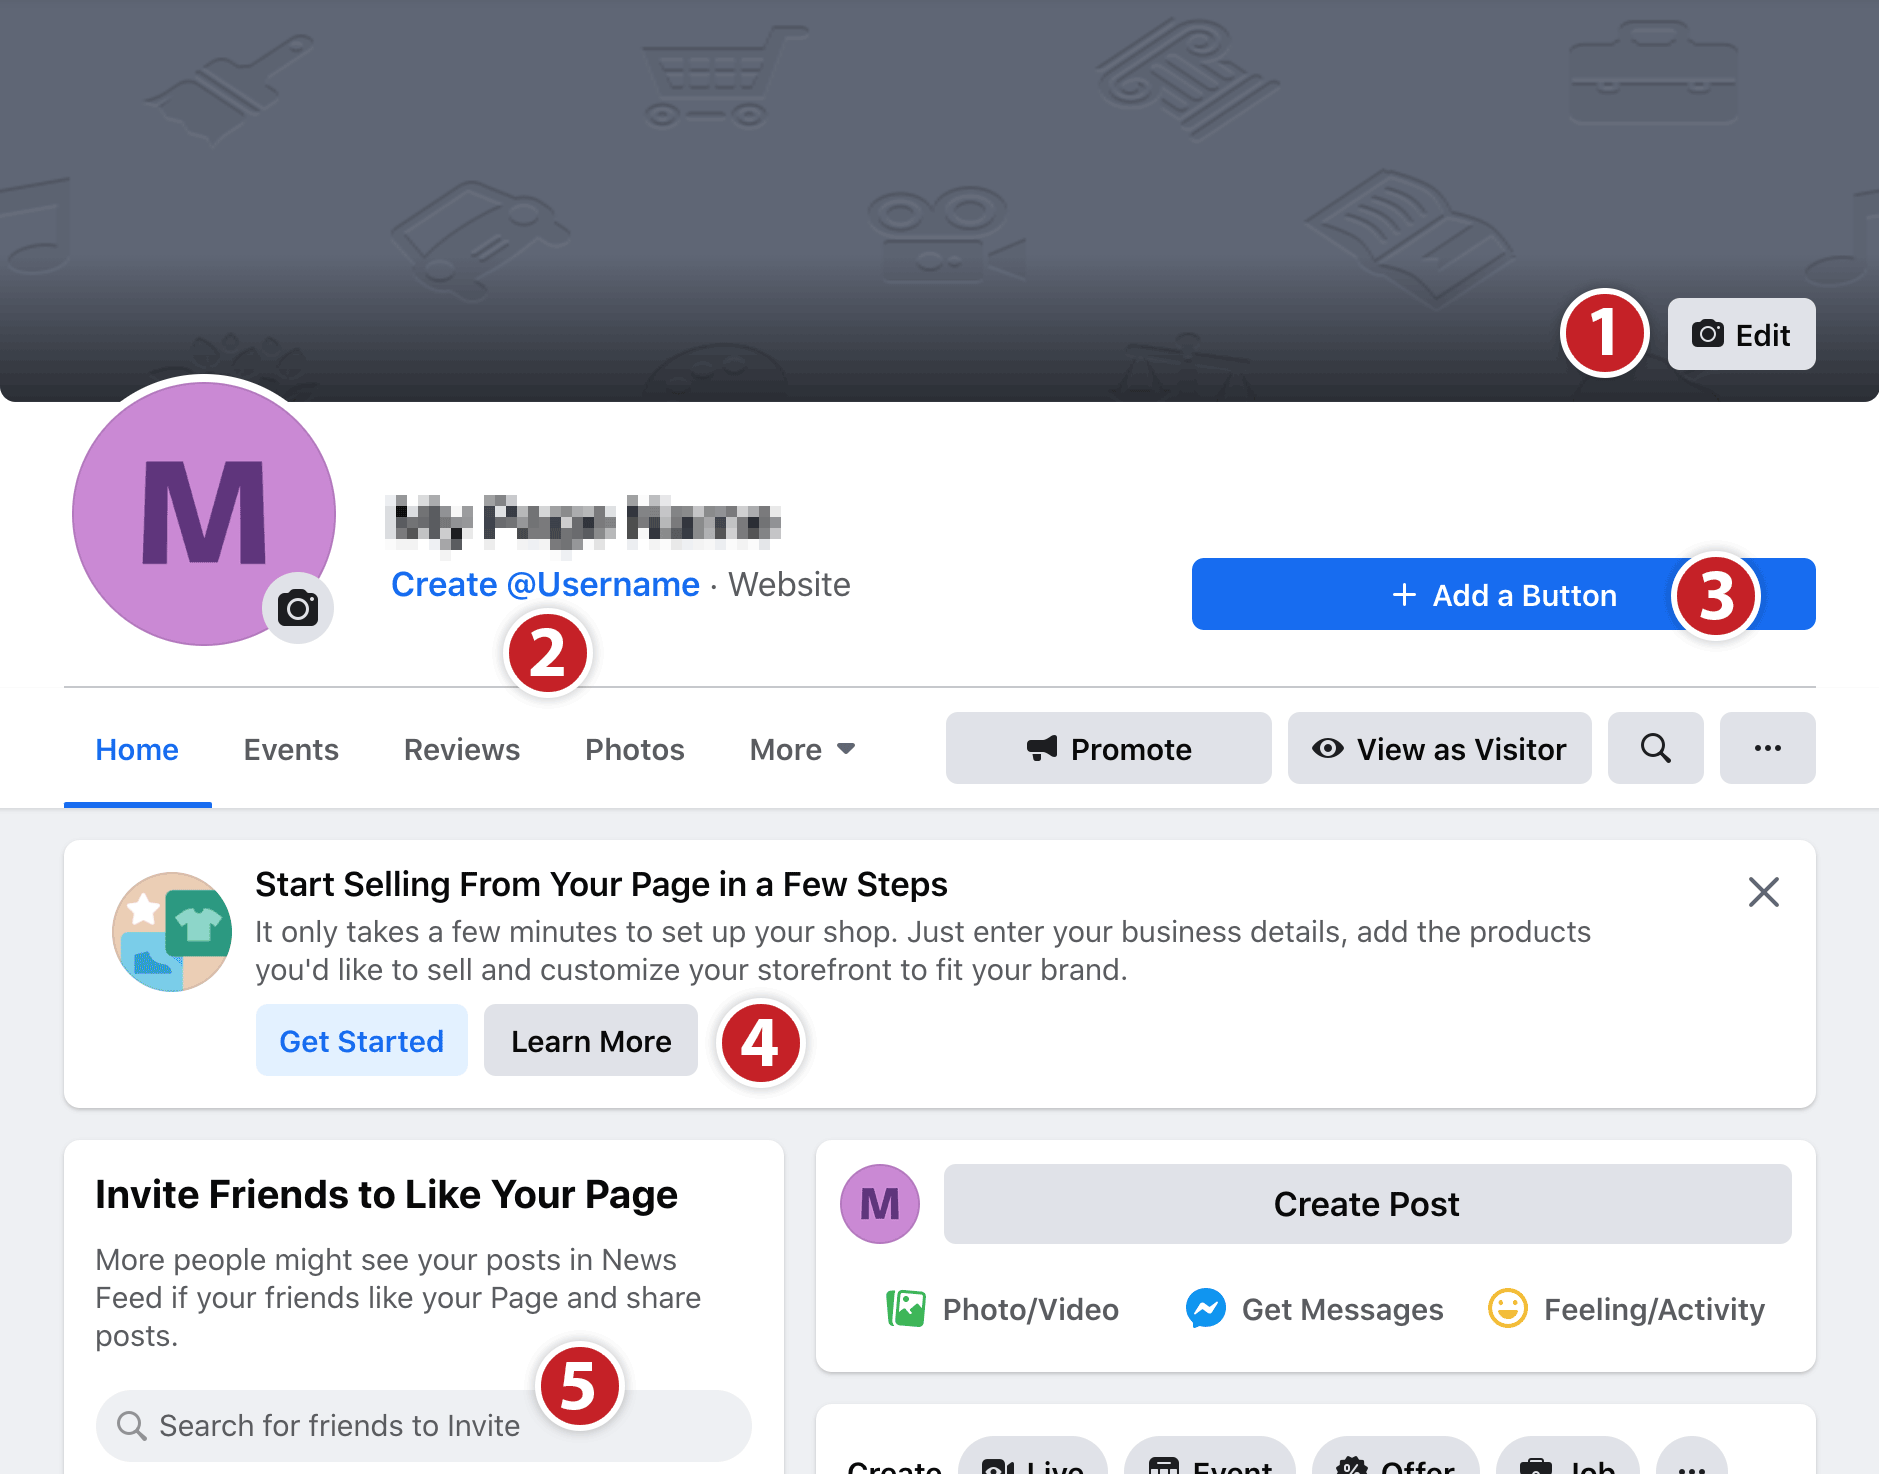
Facebook Page zones
Each of the numbered boxes on the screenshot shown above highlights an area, link, or button you can use to optimize your Facebook page.
  1. The rectangular light gray area surrounding this box is where your cover image will display. You can edit it by clicking on the edit button shown. Once you are satisfied with the image, click on it. This will allow you to add a description of the image as well as an extra link to your website. Since clicking on the banner image is the first thing many people do when arriving on a Facebook page, this is a good place to feature a short company overview and your website link.
    You can also use a cover video here, but if you go this route make sure it’s short and sweet!
  2. Clicking Create @Username will allow you to create a unique username for your page. A page’s username defines its URL, so your Facebook page’s permanent URL will be Facebook.com/username. You can’t use the same name as any currently existing page, and any characters other than numbers, letters, and periods will not work. Your page’s username must be at least 5 characters long and must comply with Facebook’s terms.
    Sometimes you will not be able to change your page’s username right away. This essentially means that Facebook does not “trust” your page yet. Fortunately, there are a number of workarounds you can use to build this trust. Not all of these tactics are guaranteed to work, but in most cases, some combination of them should help.
    1. Wait a week or two and try again
    2. Add someone else as a page admin and have them change the username
    3. Get at least 10 page likes (in most cases this is the easiest and most effective option)
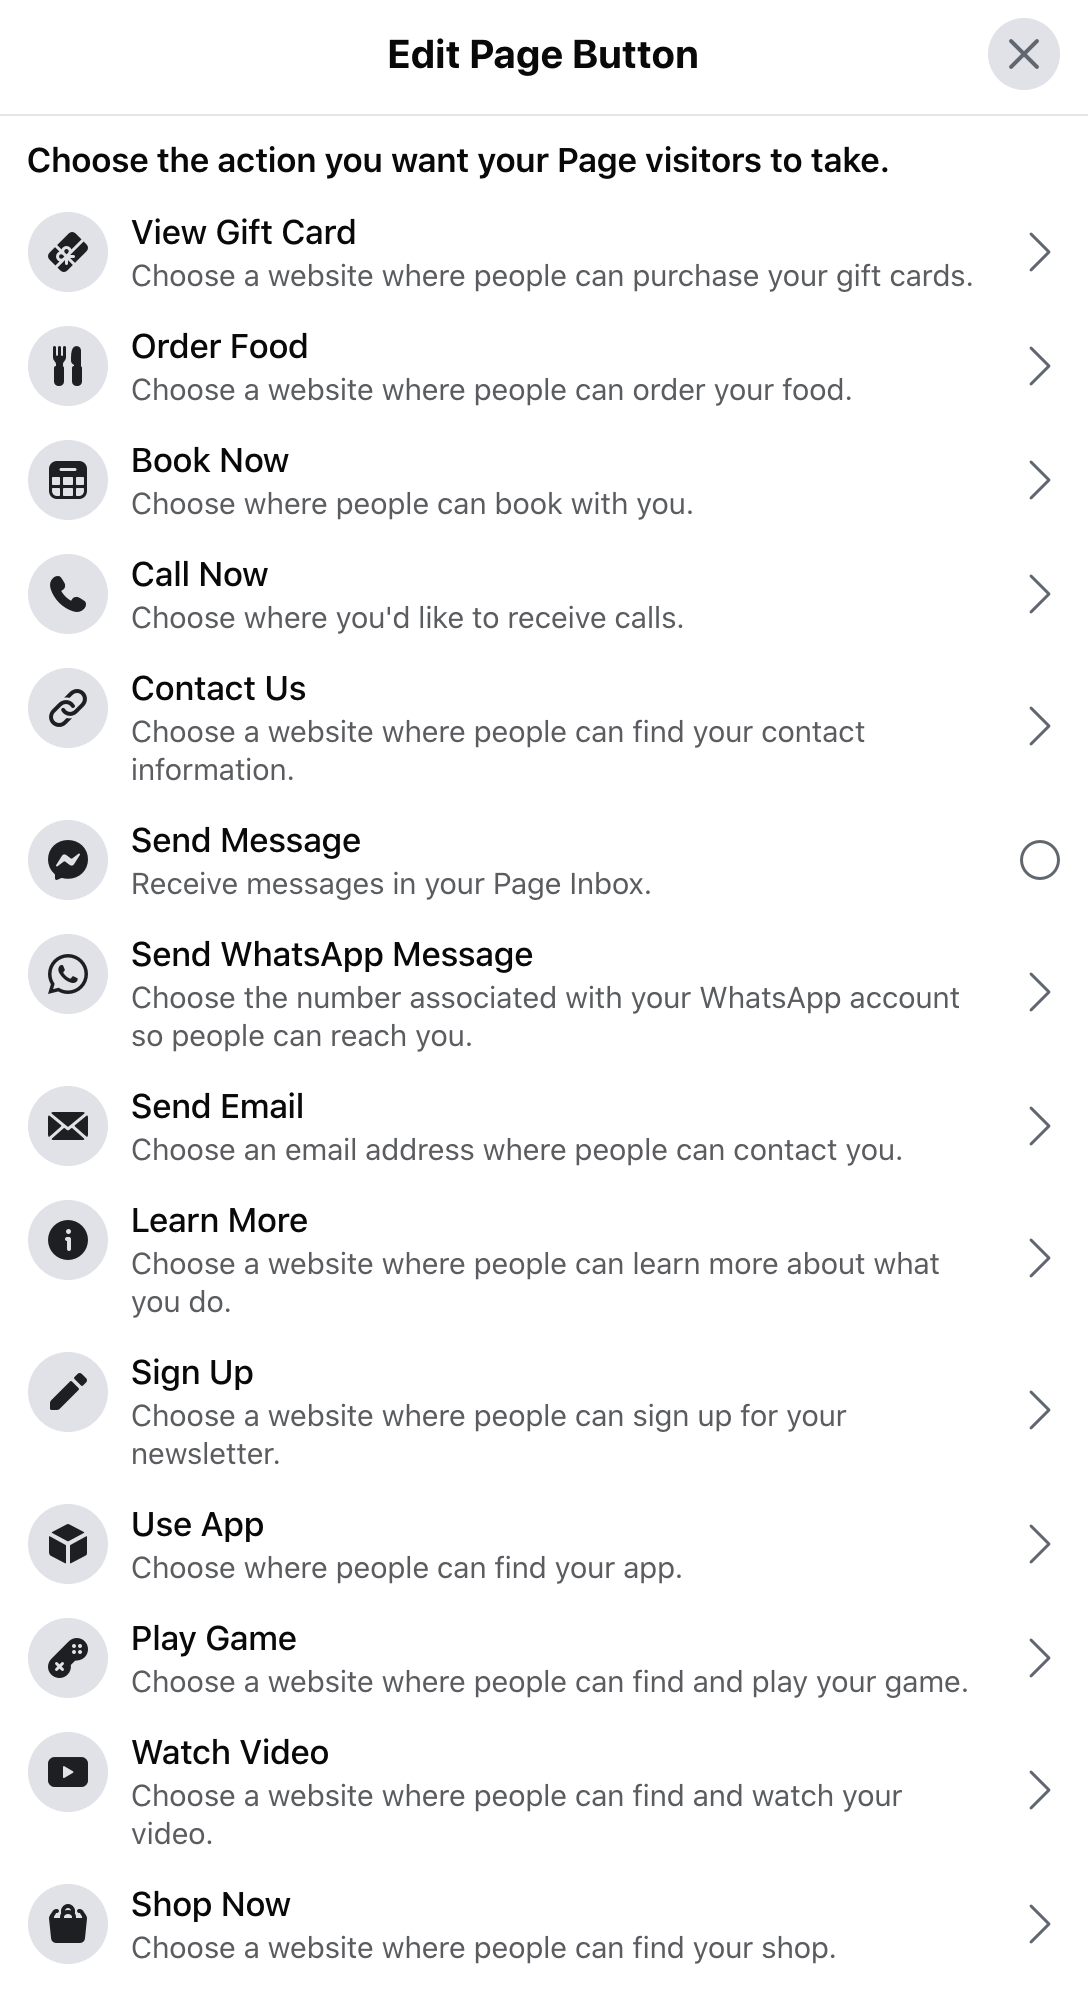
  3. The Add a Button button allows you to choose from a number of predetermined call-to-action button types to feature at the top of your page. Here’s a look at choices:
    Facebook Page Add Button
    Learn More and Send Message are popular options, but your brand goals will determine which is best for your page. You can always change the button, so don’t hesitate to test out multiple options. Typically you will want to send your Facebook followers directly to your owned website.
  4. If you’re planning to set up a Facebook Shop, you can learn how to do so or start the process using these two buttons.
  5. The Invite Friends to Like Your Page section is pretty self-explanatory. Here you can search through your friends and invite them to like and follow your page. For best results, only invite people who fit your target market, essentially those who may actually be interested in the content you post. Likes and follows from people who never engage with your page are nothing but a vanity metric.
If you’re wondering “how do I get my first 10 likes?” or “what should I name my Facebook page?”, don’t worry! Let’s take a closer look at both of those subjects.

How to Get Your First 10 Likes

The easiest way to get 10 likes on a new Facebook page is to invite any friends who will be interested in the content you plan to post. But if you don’t have any friends who are interested in the topic, or if you don’t want to share the page with your friends, you may need to use one of the following methods:
  • Find relevant Facebook groups that allow self-promotion. Post the link to your page at the appropriate time, and remember to give people a good reason to follow.
  • Pull any other audiences you have to your Facebook page - if you have a following on another platform or an email list, consider inviting them to like your page.
  • Run a boosted post or a brand awareness ad - it shouldn’t cost too much to increase your page visibility and attract your first 10 followers in this manner.
Once you have your first 10 likes/follows, you should be able to change your page’s username, and you’ll have a small audience to start sharing your story with.

How to Choose a Name For Your Facebook Page

Choosing a name for your Facebook page is similar to choosing a domain name. The best option, if it’s available, is usually the actual name of your business or brand. e.g. Web Hosting Canada. If that’s not an option, aim for something that contains a relevant keyword and accurately describes your business. When choosing your page username, you could use a short form of your business name or your site’s exact URL. For example, WHC’s Facebook page is called Web Hosting Canada, the username is WHC.CA and the URL is: Facebook.com/WHC.CA

What You Can Do With a Facebook Business Page

At this point, your Facebook page should be starting to look pretty good. But there is still MUCH more that you can do with the page’s built-in toolset.
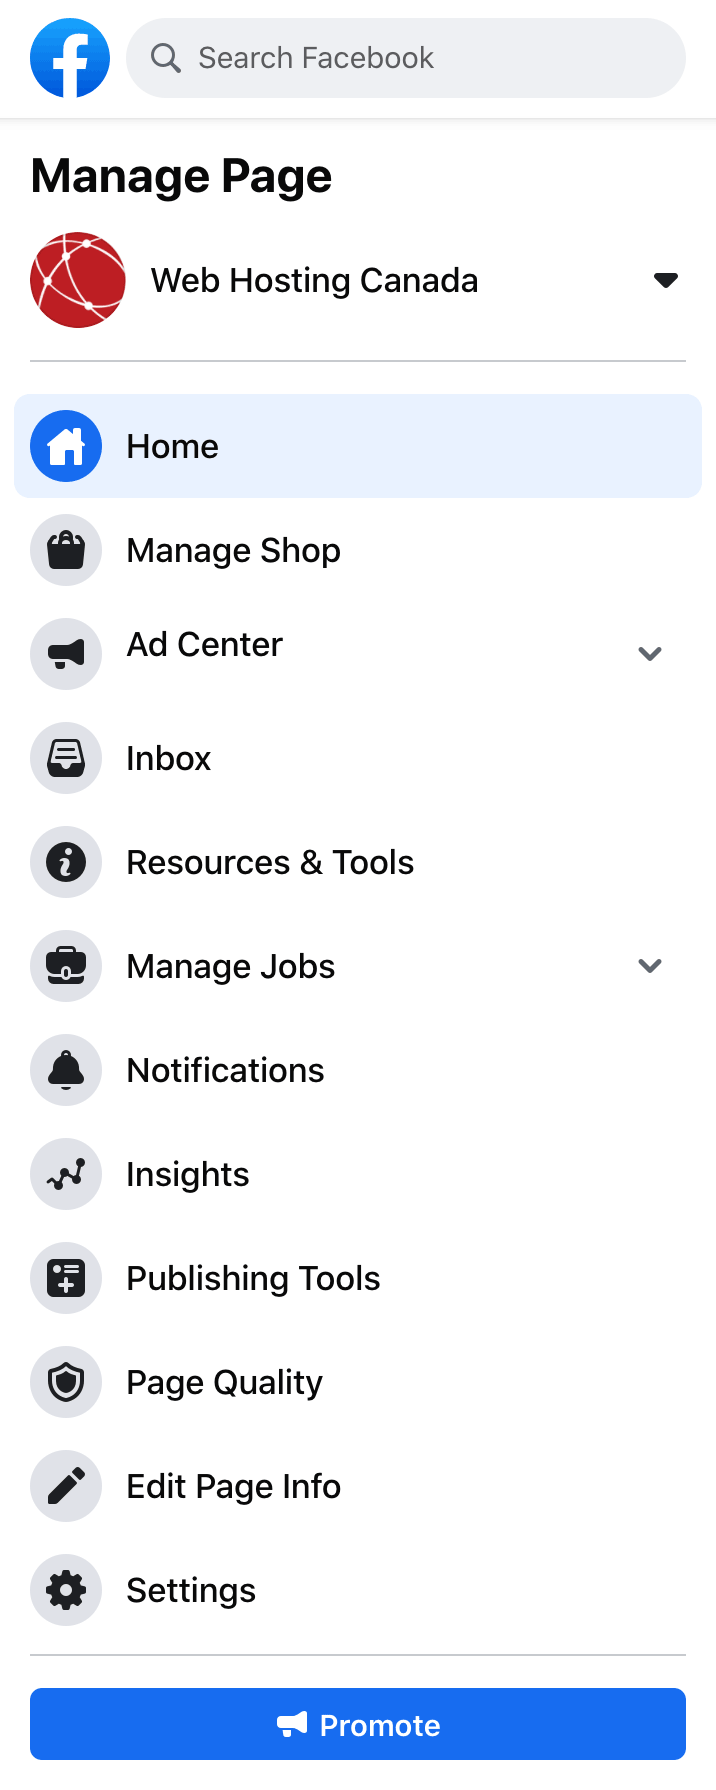
Manage Facebook Page

Manage shop

This option takes you to Commerce Manager, where you can set up an online store for your business.

Ad Center

Here you can create and manage boosted posts and page promotions. These are different from Facebook ads, which are accessible through the Ads Manager.

Inbox

This is where you can view and manage messages sent to your page by visitors.

Resources & Tools

This will send you to a different view of your page that includes instructions and links to tutorials.

Manage Jobs

Here you can connect to external hiring platforms, allowing them to display available jobs on your page.

Notifications

This tab allows you to view and interact with a list of recent notifications.

Insights

The Facebook Insights tab allows you to view insights and statistics associated with your page’s activity.

Publishing Tools

This tab takes you to the Publishing Tools page, where you can schedule posts, post in multiple languages, and create special types of posts including polls and watch parties.

Page Quality

If your page has any restrictions or violations against it, you’ll be able to find more information about them here.

Edit Page Info

This is where you can modify and add to the original information you included when creating the page. For best results, fill out as many sections as possible with complete information that matches the information found elsewhere on the web, like your own website.

Settings

This button opens a new sidebar menu that contains many powerful tools. It looks like this:
Facebook Page settings
Here’s a brief overview of each tab:

Messaging

In the Messaging tab, you can define a number of messaging settings, including the use of automated messages. This is also where you can collect your page’s Facebook messenger link.

Page Info

This is the same tab as the Edit Page Info button available on the page itself. You can modify any of your page’s existing information here.

Templates and Tabs

Templates and Tabs give you some control over the look and functionality of your business page. Decisions made here can have a significant impact on your online presence - for example, will you allow customers to leave reviews on your Facebook page? Great reviews are an amazing way to build trust and authority, but poor reviews could hurt business.

Templates are predefined structures of Tabs which can then be edited to suit your needs. Tabs are the specific elements included (or excluded) on your page.

Event Ticketing

This is where you can connect an Eventbrite account, which will allow you to sell tickets to events directly on Facebook.

Notifications

In the Notifications tab, you can choose what you get notified about and how.

Advanced Messaging

Under Advanced Messaging, you can connect and manage apps to your business page’s messenger account, including but not limited to commercial chatbots.

Facebook Badges

Here you can turn Facebook Badges on or off. Badges are special identifying symbols that your followers can earn by, for example, being a top fan.

Page Roles

The Page Roles tab allows you to add and remove new users in a variety of roles, ranging from page owner to administrator to analyst. A well-coordinated social media marketing team can make use of each of these roles depending on how much access they need.

People and Other Pages

Here you can see which people and other pages like your page. This section can be important for understanding and maintaining your online presence, as you can also use it to ban users from interacting with your page.

Preferred Page Audience

This tab is being phased out and contains a link to Facebook’s help page - it will likely disappear soon.

Issue, Electoral or Political Ads

This tab lets you apply for authorization to run electoral or political ads, a new requirement for advertisers in selected countries.

Branded Content

This tab redirects to a separate page called Brand Collabs Manager. This is useful if you’re making posts that include other businesses on Facebook.

Instagram

In this tab, you can connect or disconnect your brand’s Instagram account. Managing both Instagram and Facebook from one place can make you that much more available to your social network.

WhatsApp

From this tab you can connect a WhatsApp business account to your Facebook page.

Featured

The Featured tab allows you to select other Facebook business pages to feature on yours. This is ideal for business partners or associated brands.

Crossposting

In this tab, you can establish a crossposting relationship with another page. Crossposting is a way to use videos across multiple pages. For example, you can share videos from their original posts rather than sharing each other’s pages.

Page Support Inbox

If you contact Facebook support, this is where you’ll receive their responses.

Payments

This is where you can set or view the currency associated with your page.

Page Management History

Page Management History is a long listing of every action performed by the page’s staff.

Activity Log

Here you can view extended activity logs from your page’s history.

So do you have your Facebook Business Page yet?

A Facebook page is a free and easy way to get your social media marketing started and can be an excellent tool to drive qualified and interested traffic to your own website. It can also play an important role in your digital marketing strategy, when used effectively.

Want to learn more about Facebook? This is the first article in Web Hosting Canada’s ongoing series on Facebook marketing, strategy and tactics. Follow us on Facebook in order to get updated when we post our next guide: How to get organic traffic from Facebook.
1

How can we help?

How can we help?

Our experts are available 24/7
Chat Now

Search the Help Center

Questions?

Our friendly customer service team is available right now.

Start Live Chat
LIVE CHAT »